Showing posts with label rhinestones. Show all posts

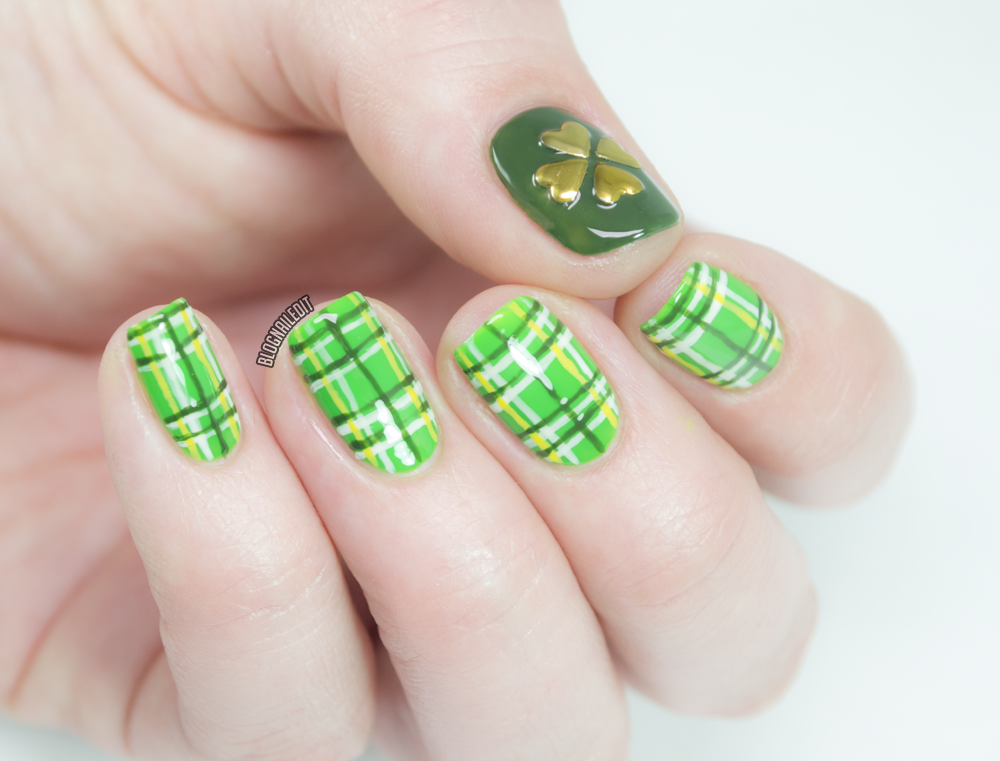
Irish Tartan

St. Patrick's Day has always been a big holiday here on the blog (from shamrocks to bejeweled greens and glittering lines). I'll use any holiday as an excuse for fantastic nail art though, and I'm really happy with this one.

I was inspired by, surprisingly, cookies created by Instagram user @gimmesugah for this design. Misty did a lovely interpretation of a green tartan/plaid on her cookies, and that pattern struck me so much I wanted to recreate it.

St. Patrick's Day Nails

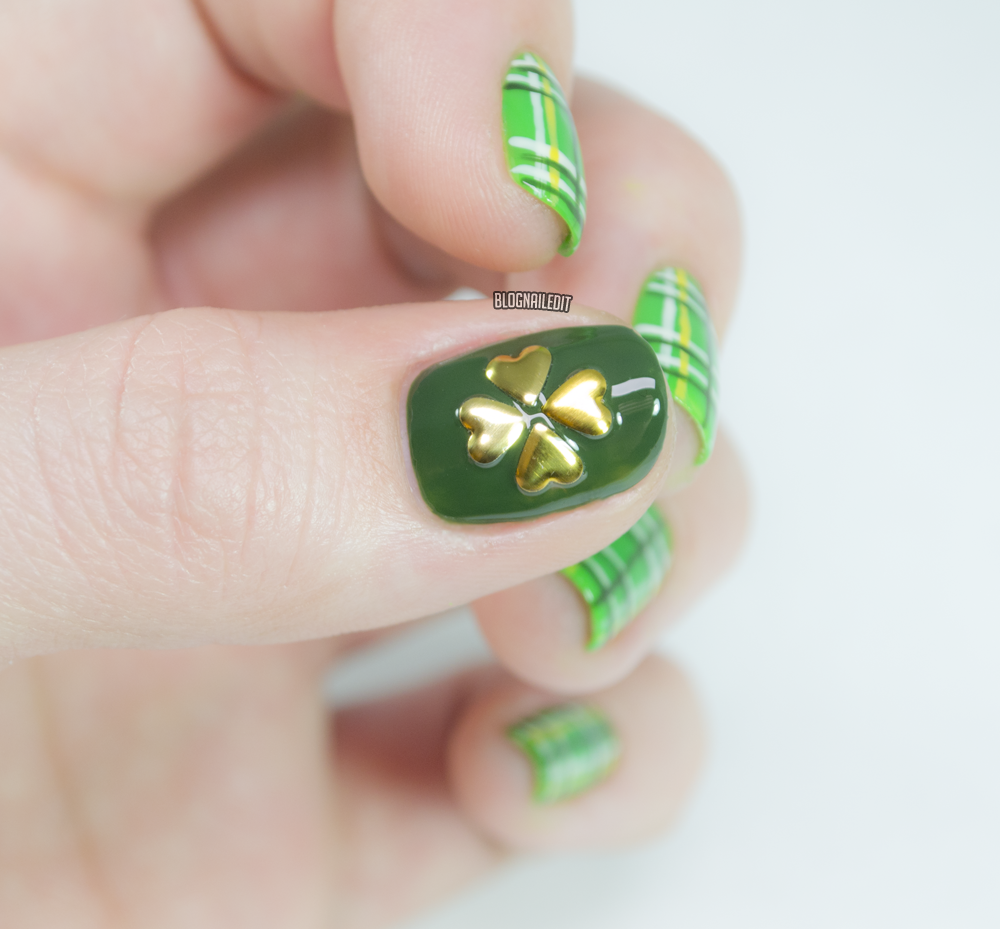
I used a pretty random selection of polishes for this design too. The dark green is Emerald Tower (lakur), the white is Look, Don't Tusk (Color Club), the light green is Kiwi Cool-ada (China Glaze), and the yellow is Sunshine (Barielle). I also used some Born Pretty Store heart-shaped studs flipped on their heads to make a perfect little four leaf clover on my thumb.

Four Leaf Clover Nails

I hope everyone has a wonderful week and celebrates St. Patrick's Day your favorite way!

Zoya Charming Collection with Darling Pineapples

August 2017...this is my redemption song. Nail art brings me so much happiness, and that's all we need in life right?  So get happy, because this past weekend, I did SEVEN new nail art designs that I can't wait to share. First up...Charming, darling.

The Zoya Charming collection is not new, but all the colors are still available individually on Zoya.com here. It's such a polite collection...sweet shades that are very, well, charming. So I put this adorable collection onto my nails with charming little pineapples!

Pineapple Positive by Nailed It @ www.blognailedit.co
Pineapple Positive
I used the pink and purples from Charming to get this look. Originally, I wanted the big pineapple to be done without the black outlines, but the negative space idea I had didn't pan out like I'd hoped. It also felt a little empty, so I brought out the neon yellow studs I got a while ago from Winstonia.com (who has folded their website in to focus primarily on Amazon.)

I thought I had filmed the process for the negative space pineapple, but apparently, I only recorded me turning off the recording. Obnoxious! So I'll just explain the process.

First, I laid down a base of Jordan. Then, using Abby, Millie and Tina, I did some random dotting. Then, using Abby, I drew the shape of the pineapple, and filled in around the outside of the shape. The pineapple got lost in the design though, so I added black to punch it up. Punch...it...up.

Ready for the sweetness? How about some swatches.
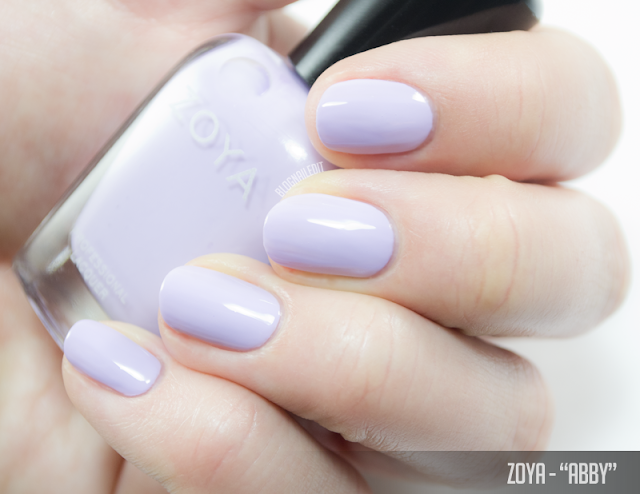
Zoya - Abby
Zoya - Abby
 Abby (2 coats) is the sweetest, lightest, creamiest lavender. It's got a little blue too!

Zoya - Amira
Zoya - Amira
Amira (2 coats) is a dusty, blue shimmer. It's a light denim with shimmer. Almost like vintage teacups.

Zoya - Jordan
Zoya - Jordan
Jordan (2 coats) is a non-chalky cool pink creme. Dainty and beautiful.

Zoya - Lacey
Zoya - Lacey
Lacey (2 coats) is a light, sweet mossy sage green shimmer. The shimmer is a little gold, but it's a beautiful subtle sheen.

Zoya - Millie
Zoya - Millie
Millie (2 coats) is a bit of an oddball for this collection, because it's more of a bright magenta shimmer, standing out among the soft pastels in the collection. It speaks volumes!
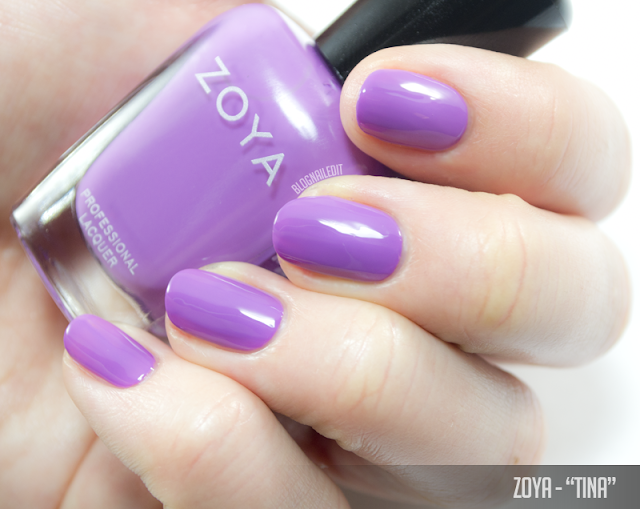
Zoya - Tina
Zoya - Tina
Tina (2 coats) is the last color, and it's a lilac creme shade to die for.

See? Wasn't that so sweet?! Get your pastel on with Charming.

The products in this post were given for review purposes. The reviews are based entirely on my experience with the products and were in no way influenced by anyone.

OPI Breakfast at Tiffany's Collection with Jewels for Breakfast

Although it's definitely not winter, I have a winter collection to share today. One might argue it's still relevant today, another might say this post is long overdue. I would agree with both people, and again apologize for all the delayed posts. Even so, you can still purchase the Breakfast at Tiffany's Collection from OPI at some retailers, like HB Beauty Bar here.

The collection is meant to reflect Holly Golightly's (played by Audrey Hepburn) effortless and classic beauty with a sense of playfulness. I also jumped straight to jewels and diamonds when thinking of nail art for this collection, so I present, "Jewels for Breakfast".

Jewels for Breakfast by Katy @ Nailed It

Jewels for Breakfast by Katy @ Nailed It

Jewels for Breakfast by Katy @ Nailed It

Of course I myself had to adorn myself in diamonds...albeit fake and born from a candle.

The beautiful blue base for my diamond nails is I Believe in Manicures. The base for the marble nails is Breakfast at Tiffany's, then I swirled Black Dress Not Optional and Five-and-Ten in to get the effect of marble.

The glitz and the glam go beyond what I've done on my nail art though. There is a LOT of glitter in this collection...ready?

OPI - Apartment for Two
Apartment for Two (2 coats) is one of the colors I meant as being relevant in this spring and upcoming summer season. It is a hot pink magenta creme.

OPI - Black Dress Not Optional
Black Dress Not Optional (2 coats) is a dark charcoal metallic - like a luxury car's paint job.

OPI - Breakfast at Tiffany's
Breakfast at Tiffany's (3 coats) is a nude off-white based creme with light gold shimmer throughout. You can barely see the shimmer, but it makes a special effect I haven't seen before.

OPI - Can't Read Without My Lipstick
Can't Read Without My Lipstick (2 coats) feels more winter, but this classic blood red creme rivals all-time OPI favorites like Got the Blues for Red and I'm Not Really a Waitress (without the shimmer).

OPI - Champagne for Breakfast
Champagne for Breakfast (2 coats) is a straight-up holographic glitter in a sheer base.

OPI - Fire Escape Rendezvous
Fire Escape Rendezvous (2 coats) is a fiery red metallic with shards of red glitter for texture. Each piece of glitter is cut randomly and jagged - no rhyme or reason.

OPI - Five-and-Ten
OPI - Five-and-Ten
Five-and-Ten (2 coats) is a very interested silver metallic. Interesting, in that it's a pinkish silver with iridescent shards of shimmer. The pink sheen was hard to capture on camera, but it is a little rosy.

OPI - Got the Mean Reds
Got the Mean Reds (2 coats) is as classic as they come - just a bright, easy, cherry pie red creme.

OPI - I Believe in Manicures
I Believe in Manicures (2 coats) is a light, baby blue creme. It applies nicely - not chalky like some pastels.

OPI - Meet My "Decorator"
Meet My "Decorator" (2 coats) is a favorite, bright orange-red creme - again, great for summer.

OPI - Rich & Brazilian
Rich & Brazilian (2 coats) is definitely rich! I wrote "WOW" in the swatch book on this one. This deep burgundy base has interesting pink shimmer adorned throughout - but it's not textured. Really dreamy.

OPI - Sunrise...Bedtime!
Sunrise...Bedtime! (2 coats) might be the favorite in this collection...another glitter suspended in a clear base, this time light pink and holo glitter. This one is slightly more dense than Champagne for Breakfast as well.

The products in this post were given for review purposes. The reviews are based entirely on my experience with the products and were in no way influenced by anyone.
OPI SoftShades Collection Swatches with Rhinestone Stack Nail Art

I'm doing a little spring cleaning - on my nails! Today I'm sharing the palette cleansing collection of the OPI SoftShades. These stray far away from the neons and brights that summer promises, but I personally welcome the change. This little collection has 6 shades that all complement even the least daring lady, with neutral pinks and whites. For the more out-there wear, there are a few glitters.

My favorite shade is Act Your Beige!, so I chose it for nail art. Only, it didn't need much. I didn't want to cover it because it's so pretty, so I just popped a few rhinestones and microbeads onto a few nails, and this stunning design came through.

I did 3 coats of Act Your Beige! because I like a milky finish. The rhinestones I used come from a few places, like Born Pretty Store.

Here's a little more side detail on the rhinestone stack.


Let's take a look at the SoftShades colors on their own, starting with one of the glitters.

OPI Petal Soft
OPI - Petal Soft

Spring Bling Nail Art for Divine Caroline

Apologies for my absence, I've been busy. New job...lots of nails!

To make up for it, how about some diamonds. I created this jewelry nail art for Divine Caroline this week.


Get the look yourself by visiting Divine Caroline here!

Impala Review & Swatches

International girls, rejoice! I've got a non-US, non-UK polish line to share today. This one hails from Brazil. Have you ever heard of or tried Mundial-Impala polish?

The line uses itty bitty little bowling pin shaped bottles and offers a wide variety of finishes. Glitter, shimmer, holographic polishes, cremes, the whole shebang. I'm showing a variety of them today for you.

The colors are a little sheer, which tends to be difficult to work with. They do self-level nicely, but the thin formula requires extra coats. Check out the nail art I did with them (and some of the rhinestones they sent along for review)!


I was inspired by two nail artists I follow on Instagram, @chinailbar and @lucinhabarteli, who is actually a Brazilian herself!

Let's look at the swatches.

Luxe of the Irish Tutorial for Divine Caroline

St. Patrick's Day means different things to different people, and at different ages. In elementary school, it was a reason to pinch your crush. At my age, it's a reason to go have more drinks during the day than at night. For others, it means something much more significant.

Either way, wearing green seems to be the persistent rule, and for us, that means green nails! I took it up a level and created this sophisticated green look for Divine Caroline.


#NailTechNailedIt: Weeks 13 & 14

Class is done! We've learned all the lessons from the book we can, so now we're prepping for our baby boards. As I've mentioned, these are practice practical board exams. We'll also be allowed to take tests called "The Hundreds", which are tests of 100 or so questions based off the real exam. We're allowed to take as many of these as we'd like in order to prep for the exams.

While we gear up for that, we're continuing practicing on real clients. Last week, I had three full sets of acrylics on real clients (not students or friends).

The first set here is a set I did on a 16-year-old client. She was a walk in Thursday night, and I accepted the challenge. Her sister was getting married on Saturday, and she was the maid of honor. She wanted a full set of a basic French, and wanted them short and manageable. As you can see in her "before", she had really short nails to begin with, so keeping them relatively short was essential to a normal look.

BEFORE
See her "after" following the jump!

Global Gradient pt. 2

Last year around this time, I posted a gradient of the nails I did for the Global Dance festival. This raver's fantasy is all about EDM and lights and good times. The ensembles are always bright and colorful, so my nails had to match.


I chose to do a gradient, which is super subtle in the shot I got, of Lollipop! Goes the Princess (Sation) and Purity (Zoya). The white is near the cuticle, and the pastel lavender is near the tip. Like I said, really really subtle! I think outlined with a triangle cutout of Sun of a Peach (China Glaze). The rhinestone accent is from my Born Pretty Store rhinestone wheel (reviewed here).

It matched my shirt, and as you can see in this blurry pic I snapped, glowed amazingly in black light!

Guest Post from Finger Painted

Happy (or is it Merry?) New Year's Eve everyone! I love New Year's Eve, as it always gives me a good excuse to get dolled up for no real reason other than to party!

For today's guest post, I thought the most appropriate nails were these ultra-blingy nails from Lexi at Finger Painted. I love these so much!


Hey everyone! I'm Lexi from Finger Painted. I was so excited to be one of Katy's guest posters! I wasn't sure what I wanted to do at first but Katy said she'd love something blingy and glitzy for New Years...so out came the rhinestones!


I used China Glaze White on White and painted the black shapes with acrylic paint. I sealed it all in with 2 coats of Poshé and then used some nail glue to stick on all of my studs and stones to make sure they stay put. The little black ones are from a nail wheel from icing. I was shocked they actually had some really cool nail art accessories! The larger silver stones are from Poochiez Nail Art Boutique and I don't remember where the other ones came from. Haha.


These were partially inspired by one of my new phone cases (purchased here). I didn't have the right colors stones to match it exactly so I just went with black and white.


Thats all for my post! If you want to come visit me I'm on Blogger, Tumblr and Instagram!

Thanks again to Katy for having me!

●Lexi●


Oh Lexi that was fabulous! I wish I had time to do my nails like that for New Years!

Born Pretty Store 3-Size Rhinestone Wheel Review

There's good bling, and there's bad bling.

This...

Rhinestones shown with Mesmerized (Essie)

...is good bling.

This...
Source: http://www.dumbdrops.com/he-just-looks-stupid-with-all-that-bling/
...is bad bling.

You can get the good bling I'm showing you here, in three different sizes, for under $5, from Born Pretty. You can get a wheel of bling.


Wheel...of...rhinestones! (Thanks Vanna White.)

Each of the three sizes has four compartments in the wheel. It's a bit difficult to see the size differences between the three in the blue mani up top, so I did another for comparison.

Rhinestones shown over gradient of Stirring Silver and Prairie Fairy (Sation)

Which mani do you prefer with the rhinestones?

I loved this wheel of rhinestones. The three sizes were all manageable, but varied enough that I didn't feel like I actually just got two sizes.

The rhinestones are easy to adhere, and you don't need glue. Nail glue will  help them last longer if you're going for longevity, but a layer of topcoat as a sticky base, then another as a topcoat over the rhinestones and polish works just as well. (I personally recommend using Seche Vite fast dry topcoat, as it's thicker and lays well over the rhinestones.)

The easiest way to put them on is to use a toothpick with a little bit of tacky topcoat on the tip to pick up each rhinestone. The Nailasaurus shows you just how to do this using glequins, but the technique is the same.

To avoid getting bubbles around the rhinestones, try not to apply too many layers of topcoat. 

You can get your own wheel of rhinestones from Born Pretty for just under $4. If you're new to Born Pretty, you'll be excited to hear that shipping is FREE...

...It gets better though! You can take an additional 10% off your entire order by using my coupon code, C10X31. 

This product was sent to me by Born Pretty. The review is based entirely on my experience with the product and was in no way influenced by anyone.

Literal Polka Dots

I couldn't get the idea of a neon yellow gradient out of my head all day. It's something I just felt I needed to do as soon as possible. So, I picked two of my all time favorite colors: Yellow Polka Dot Bikini (China Glaze) and My Boyfriend Scales Walls (OPI). I know I know, that damn greyish white has made several appearances recently (here, here, here and here), but it really deserves the spotlight. It's a perfect color.


I love the way it looks under the neon yellow. Neon yellow and grey go very well together somehow. Look at the Parsons school of design workroom this season on Project Runway:

Source: http://blogs.fidm.com/projectrunway/episodes/
I wanted to add something, but since I had done polka dots last night, I wanted to do something different, but keep it round.

The solution?

Literal polka dots...with rhinestones.

The trigger finger idea came about only because my supply of black rhinestones wouldn't have been enough to cover all 10 fingers. A nifty solution for the thrifty.

Turquoise and Caicos Studs


I thought today would be a good day to go to the gym. Decided to try one of their classes. It's called Y Pump. Doesn't sound too exhausting does it? Ask my arms that question and you'll soon learn how exhausting it is. I seriously had no extra strength in my arms to do any sort of delicate nail art, so I grabbed some rhinestones I got not long ago. I really wanted to do just gold, but I wasn't sure if I had enough to cover all 10 fingers, so I split it up with some black. Oh aren't they just lovely?

The teal is Turquoise and Caicos (Essie) and there's a layer of Glass Slipper (Sally Hansen) over the top. The rhinestones were a MASH set I bought.

Sorry, but I literally can't type much more.