Showing posts with label 3D. Show all posts

Zoya Focus Collection and Hocus Focus Nail Art

Are you ready for some sickeningly sweet cremes? Sadly, they're not particularly good tasting. Trust me, I tried. They're the other half to Zoya's newest collection pair, Focus and Flair. As I mentioned in my review of the Flair collection, my heart was really more drawn to Focus, so let's check that out today.

I'd seen a fantastic dark to light gradient on Pinterest in the past (this one here) and wanted to duplicate that at some point, but I really loved the idea of two colors from this collection, Hannah and Lidia, together. So I sponged on a gradient with the two and embellished it with some skull charms from my collection. I believe the charms were from Born Pretty Store and Winstonia, but they don't appear to have these particular charms anymore.

I call this nail art "Hocus Focus".

Hocus Focus
Click to enlarge!
See how well the two shades blend with each other, even with my not-so-on-point gradient? I guess I just need to do more gradients! I didn't adhere the skulls with anything other than top coat, because I knew I would be taking this off for more swatching.

Now let's look at Hannah, Lidia, and the rest of the girls from Focus up close!

Zoya - Charli
Zoya - Charli
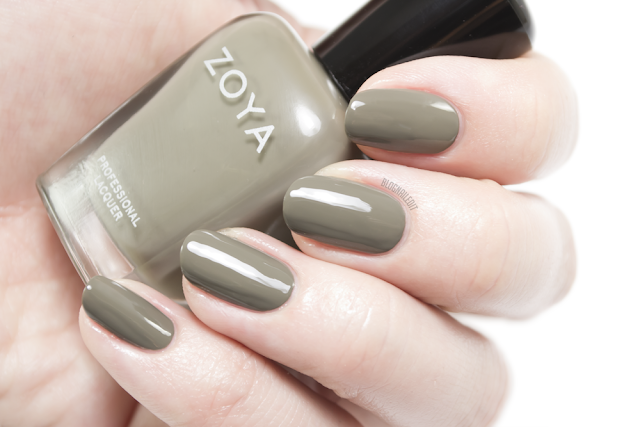
First is Charli (2 coats). I think Charli is much prettier to me than the Flair counterparts Aggie and Tris. It's a unique army green putty creme with excellent coverage. In fact, all of the Focus collection has fantastic coverage, but I was surprised by this one in particular.

Zoya - Hannah
Zoya - Hannah
Hannah (2 coats) was a surprise as well! Sometimes, when reds are so bright, they lose opacity and appear sheer, even after two even coats. But Hannah applied beautifully, and is now a favorite maraschino cherry red of mine.

Zoya - Sia
Zoya - Sia
Ok...this color is regal as hell! Sia (2 coats) makes me want to swing from the chandeliers it's so stunning! (See what I did there?) It's the most royal blue I've ever swatched. It literally looks like the picture of the swatch in person. Damn!

OPI SoftShades Collection Swatches with Rhinestone Stack Nail Art

I'm doing a little spring cleaning - on my nails! Today I'm sharing the palette cleansing collection of the OPI SoftShades. These stray far away from the neons and brights that summer promises, but I personally welcome the change. This little collection has 6 shades that all complement even the least daring lady, with neutral pinks and whites. For the more out-there wear, there are a few glitters.

My favorite shade is Act Your Beige!, so I chose it for nail art. Only, it didn't need much. I didn't want to cover it because it's so pretty, so I just popped a few rhinestones and microbeads onto a few nails, and this stunning design came through.

I did 3 coats of Act Your Beige! because I like a milky finish. The rhinestones I used come from a few places, like Born Pretty Store.

Here's a little more side detail on the rhinestone stack.


Let's take a look at the SoftShades colors on their own, starting with one of the glitters.

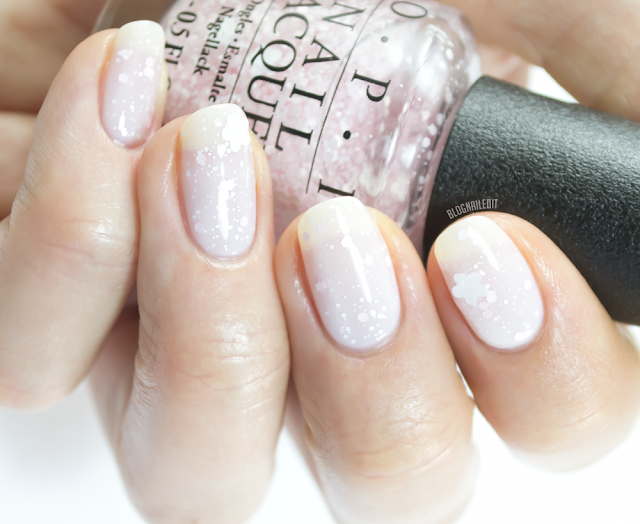
OPI Petal Soft
OPI - Petal Soft

Bundle Monster 3D Nail Metal Cabochons Review

As the nail world evolves, 3D nail decorations have become more popular and less isolated in specific nail communities. One of the easiest ways to get this growing trend is to glue on a full-nail metal decoration, like these awesome jewels from Bundle Monster.

I'm reviewing two, but they're very similar. They're about the size of a dime, if that helps with sizing them to your own nail.

Bundle Monster cabochon on top of a US dime

For this look, I just laid them on a wet top coat and let it dry. That won't hold them well at all though, and you'll likely lose them and be very sad about it. A better way to adhere them to your nail is to use nail glue on your natural nail. An even better and more secure way is to use acrylic, but if you're not sure how to use acrylic, just stick with glue.

I snazzed up these simple manicures so easily with the metal embellishments.


The first manicure uses Orly Saturated and essie Good as Gold. I hand-painted the gold designs to mimic the pattern in the cabochon. Here's a link to purchase this cabochon, which comes in a pack with 2, for $1.98.


I used this $1.99 cabochon set for my second manicure. The pink polish is Orly Neon Heat, and it's framing OPI My Favorite Ornament (outlined in black).

So if you're interested in trying the 3D look, this is a great way to wow!

To browse all of Bundle Monster's 3D decorations, click here.

These products were sent to me by Bundle Monster. The reviews are based entirely on my experience with the products and were in no way influenced by anyone.

Valentine's Day Caviar

Happy Valentine's Day readers!

Here's a little morning delight, V-Day style.


I did an OPI gradient with Chic from Ears to Tail and My Vampire is Buff, and adorned all my nails with little silver bullion beads formed into lovely tiny hearts.

Enjoy your day! I'm definitely enjoying mine!

Last night, I finished my last class in nail tech school! I'm officially graduated, and ready to take my boards! It's been a journey, and I'll post my last #NailTechNailedIt post soon. In the meantime, celebrating is in store!

Happy Valentine's Day!

Winstonia Series 1 Stamping Plate Review

Recently on Nailed It, you may have noticed a revival in stamping. That continues tonight with a review of one of the plates in Winstonia Store's Series 1 stamping plates.

I used the large floral pattern, as well as it's smaller counterpart for my design tonight, as well as a 3D fimo flower for my thumb!


I had no problem with these stamps. They transferred easily and all the lines and details translated perfectly.

Below is a shot of the plate I used, which includes several other floral ideas:


The series also comes with 3 other plates:

Image courtesy of Winstonia Store

Image courtesy of Winstonia Store

Image courtesy of Winstonia Store
This series of plates comes at a really low price. All four are available here for $4.95! SO CHEAP!

Which plate is your favorite? Which design is your favorite?

These products were sent to me by Winstonia. The reviews are based entirely on my experience with the products and were in no way influenced by anyone.

BPS Half Pearl and Rhinestone Picker Review

Born Pretty Store is getting out of control in the best way possible. Anything I need, I can get there! And I love that I get at least 10% off with every order just by entering this coupon code: C10X31.

Today I tried half pearls for the first time. These 3D decorations are different than rhinestones. They're smoother, but they stick up about as far. The wheel I'm reviewing has five colors: white, baby pink, magenta, purple, and light blue.


They all go so perfectly together, and I liked the gradient of colors.


I matched up several polishes with the pearls' colors: Kieko (Zoya), Queenie in a Bottle (Sation), Gie Gie (Zoya), and Lady in White (Duri). I also added Electrical Storm (Sation) over my thumb and index finger to keep it shiny, just like the pearls.

This manicure, though a little complicated looking, was really easy to achieve! I used the rhinestone picker from BPS to place each pearl.


The rhinestone picker is a wax pencil that you sharpen like any other pencil or makeup pencil. The "lead" is actually wax, so it's slightly sticky. It makes picking rhinestones and 3D decorations impossibly easy and quick. I had to sharpen mine down to a ridiculous nub because apparently, it's got cat crack in it and it's irresistible to hungry felines. Jerks.

Pick your pearl wheel here for $3.55 and your rhinestone picker here for $1.99, and don't forget to use the coupon code for 10% off.


These products were sent to me by Born Pretty Store. The reviews are based entirely on my experience with the products and were in no way influenced by anyone.

Winstonia August Grab Bag


New month, new grab bag!

Winstonia's August Grab Bag, available here, contains the following:
Before I get into the details of the contents, here's my design using the ceramic flower charms!


Here's the breakdown of the nail art. My thumb, middle finger, and pinky finger are a base of Strumming My Nails (Sation) with Fairy Dust (China Glaze) on top. My ring finger is the ever-gorgeous Storm (Zoya), and the base of my index finger is Black Onyx (OPI). I painted the flower on my middle finger using Alpine Snow (OPI) and outlined it with Black Onyx.

Now let's talk details of a few of the pieces.


The ceramic nail charms aren't hard, as the word ceramic sounds (to me). They're pliable and feel a bit like Play-Doh. Each has a rhinestone in its center. The one I placed is the largest, and they get smaller from there.


The faux stones are a bit of a disappointment to me, but only because they're not flexible, and my nails are too small for them to lay flatly. Too bad. I have pretty tiny nail plates though.


I haven't tried the nail foil stickers yet, but they seem nice. And the glue is always helpful.

But okay...eyeliner stickers?! I've never heard of this before, but this clearly doesn't gain its popularity in the U.S., as indicated by the all-Japanese labeling. There's literally no English on the package, so fending for myself, I tried applying the sticker to my clean, oil-free and makeup-free eyelids. I didn't have much luck. It stuck...sort of. But it looked like a sticker on my eyeliner. Not a good look for me, so I'll spare you the pictures.

Shipment of these bags began August 12, and you can get them for just $10 with free shipping and no subscription required. Follow this link to purchase your August Grab Bag.

These products were sent to me by Winstonia. The reviews are based entirely on my experience with the products and were in no way influenced by anyone.

Gold Chain Born Pretty Store Review

Remember my chain nail art tutorial? Well that's a 2D look that you can get with any two colors.

But if you want the true chain effect and you really want it to pop off your nail, then you might consider getting an actual chain to attach to your nails!


Born Pretty Store (BPS) offers several varieties of chains, and today I'm reviewing the 1.6mm gold chain for you!

This chain is 100cm long (about 40 inches), and quite small (1.6mm), running at $2.99 (and their always-free shipping). Use my coupon code, C10X31, for 10% off!

The chain comes in a teeny ziplock bag, but it doesn't come out all tangled like necklaces tend to be.

To apply it to your nails, I recommend using a dab of nail glue, at least on the ends of the chain. To place it, apply it to still-wet nails (I prefer to apply it to the top coat layer rather than the polish layer) so you can position it properly. When it has dried, to being almost tacky, carefully lift the each end with tweezers and dab a bit of nail glue. This will keep your chain in its position, but you can always use more glue if you plan on roughing up the design. And let's face it...this kind of look is begging to be roughed up a little. Rawr!

I'm obsessed with letting the chains hang off my nails in different ways like I've done for this look. It's odd, and not necessarily appropriate for all occassions, but damn...it's awesome!

The colors I used for this look included Sun of a Peach (China Glaze) and Stranger Tides (OPI) with lines of Black Onyx (also OPI). I also did some cutouts of my bare nail.

Which finger do you like the most? How would you wear chains? I've seen some fabulous designs, including Sammy's looks, Lexi's take, and Whitney's! I have another review of a silver look coming soon too.

Thanks BPS for the chains!

Pick your's up here, and don't forget to use the coupon code for 10% off.
 

These products were sent to me by Born Pretty Store. The reviews are based entirely on my experience with the products and were in no way influenced by anyone.

Winstonia July Grab Bag

There's another Winstonia grab bag available, and I love this one! It's available for $10 (free shipping) until July 31. If you like what you're about to see (and I bet you will), then you can pick it up here at the Winstonia Store.


This month's bag includes:
  • 2 nail art stud wheels (Design 2) (Design 3)
  • 1 nail art polymer slice wheel (details)
  • A package of wooden cuticle pushers in 3 different sizes (details)
  • A multi-purpose eye brush (details)
Overall, it's a $24 value that you're getting for $10.

I loved the nail art studs the most, so I created a look using several different kinds of studs from the two kits.


So fun right?!

Here's a closer look at what's available in each of the wheels:


I love the variety, and I definitely feel like I'm getting a value.

And though the brush is advertised as a makeup brush, I'll likely be using the angled end as a cleanup tool for my cuticles!

This is an excellent 3D grab bag, which reminds me...time to announce the winner of my 3D nail art contest!

Though it was difficult to choose and I feel bad not letting more than one person win, I decided on a winner:

Ria Marii from Brush me Blush!

Nail art and photo by Ria Marii from Brush Me Blush
She was very creative and neat with her 3D work, and I'm so happy I now know about her blog. Well done Ria!

Edit: It's my own fault that I did not ask people to prove it was their natural nail as the rules stated was a requirement, so though there has been controversy about whether or not these are her natural nails, I unfortunately have to go by the honor code in this instance. Ria assured me they were her natural nails, and I'm sorry if some of you disagree. I myself am not 100% confident either, but I put myself between a rock and hard place by not asking for proof. It is what it is now. I will be removing comments calling out these facts, simply because it's not worth generating additional controversy. Again, I apologize to everyone.

If you've got the 3D itch and want the July Winstonia grab bag, then you can grab yours in the Winstonia store until July 31st for $10 with free shipping and no subscription required.

These products were sent to me by Winstonia. The reviews are based entirely on my experience with the products and were in no way influenced by anyone.

3D Nail Art Contest

It's contest time! *cue fanfare*

My excitement to see the creations others come up with, combined with the generous contribution of BornPrettyStore.com led to the decision to give you guys a chance to win a nail art contest.


This contest's theme is 3D! There's been a lot of innovation in 3D nail art (my favorite right now being the 3D bow tutorial from Finger Painted), and I want to see your ideas come to fruition. You can browse some of my 3D creations, new and old, here.

Plus, BornPrettyStore.com is my top provider of 3D nail art supplies, so it makes sense that this be the theme with their sponsorship as the prize.

What is the prize you ask? It's a generous gift card to BornPrettyStore.com for $25!

I know how difficult it can be to come up with a design, so I'm giving you all lots of time to create something. This contest will run until June 30th at 5:00pm.

All submissions will need to be submitted using the InLinkz tool at the end of this post. In addition, since I'm too cheap to pay for the subscription service InLinkz offers to get the thumbnails, I'll be pinning all the creations on a Pinterest board for your viewing pleasure. Though voting won't determine the winner, it's still fun to share all your inspiring ideas with everyone.

Here's a link to the Pinterest board.

Here are the rules, which you must follow to be considered for judging.
  • You must be 18 or older or with your parent's permission to participate in this contest.
  • This contest is open internationally.
  • You must be the creator of the look, and it must be done on your own nails.
    • I understand that you may already acrylics adhered to your nails. In those cases, you may still submit an entry. However, please do not add any additional acrylic or mold form to your nails to extend their length if you do not already have some.
  • At least one 3D element must be incorporated into your look. More is encouraged!
  • 3D basically means anything that can be seen and felt on the surface of your nail:
    • Acceptable items: micro beads, studs, spikes, acrylic nail art pieces, rhinestones, fimo slices, chains, jewelry, pearls, etc.
    • Unacceptable items: striping tape, glequins, decals, stickers, textured nail polish, flocking powder, glitter, etc.
    • If you're unsure if something counts, ask me. I'll update the list to clear up any confusion.
  • Submissions must all be entered using the InLinkz tool below by June 30th at 5:00pm MST. I've submitted one to show you how it looks.
  • Only one entry per person.
  • You may use purchased 3D materials, or create your own.
  • Your post must be new.
That's it! Feel like you can meet all those requirements and still knock out some killer looks? I thought so! Get to creating, and feel free to post any questions you have about anything.

A huge thank you to BornPrettyStore.com for sponsoring this contest!!! Be sure to stop by their site, especially if you want to pick up some 3D supplies!

Grungy Glamour

I can't get enough of gradients, or as they're more and more often called, ombre.

My hair's got an ombre gradient, my favorite, albeit holey, sweater has a gradient, and my favorites on Instagram often contain a gradient.


This grungy gradient was inspired by this pin of ombre tights. The purple is from Savina, and it's called Dream. It also uses Black Onyx from OPI. The square studs are my package of Born Pretty Store square studs that I reviewed here

Serum No. 5 Swatches and Review

I've got some swatches and nail art for you today! I've actually had these swatches ready for a while, so you'll notice a discrepancy between the length of my nails in the swatches and the nail art. Don't worry, they're still my fingers.

The swatches today are from Serum No. 5. I've got twelve colorful and glittery swatches today. The consistency of the polishes ranged a bit, and you can get the details on that in the description of each polish.

My favorites in this batch include Mint to Be, Happy Special Day, Thanks for the Memories, and Girl's BFF. I used three of these in today's nail art, which I'll tease you with first.


The nail art was done with Mint to Be, Thanks for the Memories, and Girl's BFF. I also used a few other polishes: Mahogany Magic (China Glaze), Neely (Zoya), Case Study (Essie), and Black Onyx (OPI). I also busted out some micro beads from ages ago to outline my two little leopard hearts.

Now onto the swatches! You can get each of these at the Etsy Serum No. 5 store here.

Fallen
Fallen
Fallen - A fall glitter mix, this features copper shimmer with gold, red and orange metallic glitter pieces. It's thin, and looks best worn over another polish. I've used two coats of it over the complementary Life Preserver (China Glaze).

Mint to Be
Mint to Be
Mint to Be - I used four coats of this soft mint shade with nothing underneath. Though a bit streaky, the mix is a great concoction! The base is a sheer mint opaque polish with very subtle darker mint shimmer, plus larger hexagonal silver glitter mixed in. The sheerness of the base makes it perfect for jelly sandwiches, without the extra steps and bottles.

Call It a 'Treuse

Call It a 'Treuse
Call It a 'Treuse - If a dinosaur had chicken pox, I imagine it would look something like this. This is definitely something you want to layer, like I did over Def Defying (China Glaze). Green metallic shimmer base and larger pieces of magenta glitter. I didn't have any trouble getting the purple pieces onto my nails either, which was great!

Forest Lights

Forest Lights
Forest Lights - The shimmer quantity in this formula could probably be used on its own, though I imagine it taking about 4-5 coats to reach opacity where visible nail line wouldn't be seen. So, I used another base color for this swatch (Jade is the New Black from OPI). There's gold shimmer in the mossy green suspension, with larger hex pieces of glitter in colors from silver, kelly green, and teal. I love the name for this polish, as it describes it perfectly!

Spring Into Love

Spring Into Love
Spring Into Love - I love this one! Again, I prefer it over a base color (I used Portia from Zoya here). I used two coats of Spring Into Love for this swatch but I think I actually like it better with just one! I'd call this a princess polish, because not only does it have the pink shimmer base, but also pink, purple, and gold glitter pieces.

Rise and Grind

Rise and Grind
Rise and Grind - I think this may also be a perfect fall color to lay over some fall bases. I used Forbidden Fudge (Avon) as my base, plus two layers of Rise and Grind. Light brown and gold shimmer, plus copper and matte white glitter. I'm crazy about the matte white glitter, which you'll see in two other swatches from Serum No. 5 later.

Stormy Weather

Stormy Weather
Stormy Weather - If this is bad weather, then get me a raincoat, I'm ready to get out there. I really enjoyed this polish a lot. There's a silver shimmer base, with bits of blue, purple, black, and even a bar glitter, which is silver. The black is my favorite piece, and makes it pop, especially over the base I chose, which is Super Nail-tural Powers (Sation). I used two coats of Stormy Weather.

Pretty Blue
Pretty Blue
Pretty Blue - Honestly, I think Beautiful Blue would've been more appropriate. This thin, clear base suspends blue, pink, and magenta glitter and even holographic flecks. You can see that it didn't tarnish the base color at all (which is Tobey from Zoya). I hate it when glitters have weird shimmer that discolors the base color, but this one doesn't do that at all.

Starry Nights

Starry Nights

Starry Nights - Unfortunately, my picture isn't translating this polish well. The polish is a blue shimmer base, but it also has an irridescent purple shimmer to it, that comes out at certain angles. The holographic glitter are different than in most of the other Serum No. 5 polishes I have today, in that they're oddly shaped. There's a mix of square and stars! The stars are sparse and difficult to find though, and they do kind of perk up at the edges and don't lay flat. I used Celestial (Pure Ice) as my base.

Girl's BFF
Girl's BFF
Girl's BFF - Such a dreamy and lovely polish. I showed it over white, but it would bring a fabulous sparkle to any color! My base color was Purity from Zoya. BFF is a holographic conglomoration, with differing sizes and a wonderful consistency of various holographic glitter and shimmer.

Happy Special Day

Happy Special Day
Happy Special Day - Loving the name of this too. It's a very joyous and fun polish, perfect for a party or some other joyous day. It's made primarily of white matte glitter, but a full spectrum rainbow of metallic glitter and a few bars here and there really bring the party out. There's also some flecks of transluscent holographic shimmer as well, which you can see when you pair it over a dark base, like Raven from Zoya.

Thanks for the Memories

Thanks for the Memories
Thanks for the Memories - Black and white matte glitter in a variety of shapes and sizes, this one's classic. I will always love black and white glitter mixes. This one also has some holographic shimmer, which adds a little more depth when you use it. I used it over Almost Famous (Color Club).

So there's the glitter extravaganza that is Serum No. 5 polishes. Only one of them really worked as a polish by itself, and that's Mint to Be. The rest are best enjoyed with bases.

Which is your favorite? You can pick them all up at the Serum No. 5 Etsy store for $7 for a 9ml bottle and $12 for a 16.7ml. Right now, 20% of your payment will also be going towards a charitable donation! You can see some of the donations in the Facebook album.

These products were sent to me by Serum No. 5. The reviews are based entirely on my experience with the products and were in no way influenced by anyone.