Showing posts with label nude. Show all posts

Bubble Up

Happy New Year everyone! 2019...it's weird to say. I started this blog 8 YEARS AGO! 8 years ago, I thought what other girls were doing, sharing their nail pictures and playing around with graphic art in blog form, was so cool, that I gave it a shot. I figured, "Why not? I like nail polish too!" It was humble beginnings (check out this early post), and it wasn't really for anyone but me. If someone else read it, cool! If not, it was a good excuse to stay busy after work. Then, it exploded. Posts were shared, tutorials were shared, magazines picked me up, and before I knew it, I was switching career paths to pursue what I thought would be a silly hobby. And here we are, 8 years later.

I didn't make any resolutions this year, but I did get a little bit of an idea I'd like to try to keep up with. While shopping for a new planner, I came across a journal with 300 drawing prompts. Just half pages with words at the top to inspire you to draw. After having so much fun with Inktober, I tossed the book into my basket with the resolve to do some from time to time. No commitment, just some inspiration.

Then I did today's design. Which wasn't inspired by the journal at all.

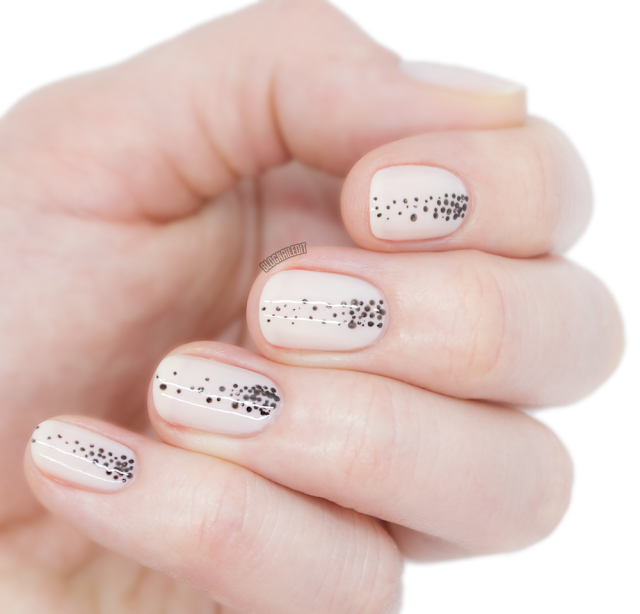
It was actually an idea taken from this Born Pretty stamping plate. I just simplified it with some basic colors (Act Your Beige! and Black Onyx from OPI).

Soft pink easy nail art - Nailed It @ www.blognailedit.com
Bubble Up!
It's like champagne bubbling up from the bottom of a glass. So cheers...to many more years!

Inktober - Weak

I wish I had the solution to weak nails. It seems that solutions fix for a while, and then it all goes to hell. But at least even my thin nails never look like THIS in real life. This is "weak" for Inktober day 15.

I used a few reds from OPI (Amore at the Grand Canal and Can't Read Without My Lipstick) as well as some Zoya nudes (Chantal and Cathy). My nails are barely holding together after the icy and early snowstorm Boulder got this weekend, but again, at least they don't look like this!

Inktober - Cruel

Thanks for your patience yesterday when I had to skip a day. I won't be "cruel" and keep day 11 from you any longer though, so check out my Inktober Day 11, "cruel".


This was a tough prompt for me, because I didn't really want something sad or upsetting to anyone. When I drove out to visit a friend earlier today, there was roadkill on the side of the road, and I got to thinking about how upsetting it is how animals are often treated; caged and bound. As I thought of caging, I thought of the perfect idea for "cruel"...barbed wire! And although the stuff itself isn't pleasant to be around, snaking it around my free edge as a funky French is more than pleasant!

Today's prompt for day 12 is "whale", and after having a whale of a good time tonight, I'll work on the design, but I probably won't get it up until tomorrow, which is technically day 13. Hang tight again...I'm having too much fun!

OPI SoftShades Collection Swatches with Rhinestone Stack Nail Art

I'm doing a little spring cleaning - on my nails! Today I'm sharing the palette cleansing collection of the OPI SoftShades. These stray far away from the neons and brights that summer promises, but I personally welcome the change. This little collection has 6 shades that all complement even the least daring lady, with neutral pinks and whites. For the more out-there wear, there are a few glitters.

My favorite shade is Act Your Beige!, so I chose it for nail art. Only, it didn't need much. I didn't want to cover it because it's so pretty, so I just popped a few rhinestones and microbeads onto a few nails, and this stunning design came through.

I did 3 coats of Act Your Beige! because I like a milky finish. The rhinestones I used come from a few places, like Born Pretty Store.

Here's a little more side detail on the rhinestone stack.


Let's take a look at the SoftShades colors on their own, starting with one of the glitters.

OPI Petal Soft
OPI - Petal Soft

Center of the Tribe

So this design was originally meant for a tutorial, but after trying to recreate the steps I did on paper, I realized it wasn't as simple as I'd hoped. It took a lot of retracing steps to make the lines look nice, and even still, it was a bit of a pain in the ass, so rather than a tutorial, here's some tribal eye candy instead! (Don't worry, another tribal look is on its way!)


I used four colors for this. Ali from Zoya, Sand Tropez from Essie, and two stripers from Color Madric in black and white.