Showing posts with label neon. Show all posts

Inktober Day 27: Music

Is anyone else missing live music as much as me? COVID has just killed that this year, and I really hope it changes soon. But in the meantime, this is as close as my nails get to music right now.

neon sign nails

On a base of Licorice (essie), I painted each letter in Sharktooth (Jessica Cosmetics), then outlined them in neon polishes including Chatty Catty and Skater Dater (Sation), Funky Yellow (Kleancolor), and Neon Heat (ORLY). Then I painted over the neon again with white. It's actually really simple and really effective if I do say so myself. I also added some neon glitter on my thumb with Phoenix (Pretty & Polished) and Frankenstein Spit (jindie nails).

Who else misses live music?

Inktober Day 9: Throw

Today's Inktober prompt is "throw." I couldn't get "throw a dog a bone" out of my head, so I decided to just do a bunch of bones, in the spirit of Halloween and all. 

bone nail art

Color Club inspired this look today with Look, Don't Tusk and What a Shock!

Inktober Day 13: Ash

Welcome to another episode of "Katy Takes the Prompt to a Whole New Level," featuring "ash" as the prompt. There's this little bug, called the ash borer. It's named that because it bores into ash trees. In its wake, it leaves these interesting patterns on the wood, all while slowly killing it. Sad, but beautiful.

I took that little pattern and put it on more interesting colors (Neon Heat from ORLY and Black Hole from INM) for my design today. Pretty cool huh?

#inktober #inktober2019 #nailart
Inktober Day 13 - Ash

Inktober - Clock

It's sort of fate that on the night I need to post twice, the theme is "clock" and I feel like it's late enough at night that this day 14 Inktober nail art is exact.


This digital clock art just used 3 colors. The base is essie Licorice, the white is essie Marshmellow, and the green tint is Kiwi Cool-Ada from China Glaze.

That's it! We're finally caught up! Hopefully I can continue this tomorrow with day 15, "weak".

Inktober - Poisonous

If you follow me on Instagram, you saw earlier today that I'm following a challenge unique for October, and actually not exactly designed for nail art, but practically meant for it - Inktober.

This challenge gives a prompt each day in October for artists and illustrators, all themed appropriately for the year's spookiest month. Here's a look at the prompts:


As you can see, today's prompt was "poisonous". Here's today's poisonous nails. Feels good to have nail art on my hands after a long, much needed break.


I only used a few polishes for this look. The yellow base for the danger skull is Funky Yellow (Kleancolor), and the green is TLC (Kleancolor). My black fingers are Licorice (essie), and the Uninhibited (LA Girl) is the black matte sparkle for my thumb.

Tomorrow's theme, tranquil, has me thinking, but if you have ideas, send them my way! I'd love to collaborate!

EDC 2016 Nails

A close group of friends and I annually go to one, if not THE, biggest music events in North America, called The Electric Daisy Carnival. EDC brings the world's most talented DJs together in an event you can't even begin to wrap your head around. To get an idea, check out Under the Electric Sky, a documentary on the event.

We partake in the Las Vegas event (the main one), and to see how the community EDC creates can foster such happy people and good music is pretty amazing. If you ever have the chance to go, and enjoy dance music, do it!

In the past, I dressed up in some pretty ridiculous costumes, but that's tamed down a bit as I've gotten older. What I lacked this year in costume though, I made up for in nail art, as you can see by my EDC nails!

EDC Nail Art by Katy @ Nailed It www.blognailedit.co
Left Hand
EDC Nail Art by Katy @ Nailed It www.blognailedit.co
Right Hand
I dug deep into my massive polish collection to get the right effect for each nail. I used a lot of colors from ORLY's PCH (Pacific Coast Highway) collection, and the glitters on my thumbs were both Color Club minis (British Invasion and Neon Static).

The owl on my left hand's middle finger is the symbol for EDC. Each year, the stages represent him in a different way, but that particular design I did based on a sticker that came with the tickets. The daisy reference is also pretty obvious on both hands, although my right hand didn't get as much detail. I'm not fully ambidextrous.

If you have any questions about the techniques used for these looks, feel free to comment below!

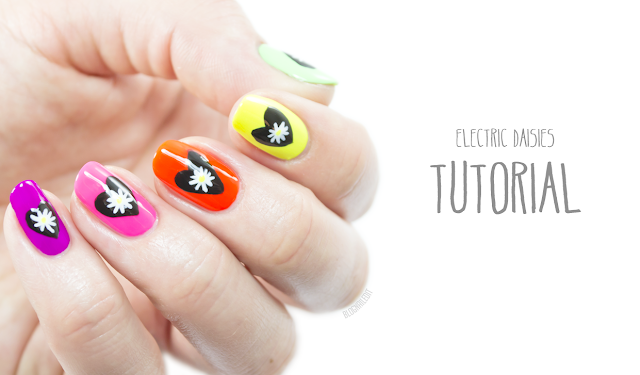
Festival Nails - Electric Daisy Nail Art Tutorial

Whether you're kicking it at Coachella or raving the night away at EDC, festivals are probably on your summer lineup. When preparing your festival fashion, don't forget your fingers and try this fun festival nail art I did for Divine Caroline.

EDC nails festival nails daisy nails


I'm a huge EDM fan, so my colors went beyond neon, but mix it up to match your festival style.

Get detailed instructions for this look over here at Divine Caroline, and tag me in your recreations!

Color Club - New Poptastic Swatches

Fans of the old Color Club recognize the brand by its square bottles with the little daisy symbol and cheap prices, often spotted (at least in the US) at bargain stores like Ross or Marshalls. You probably also recognize one of the brand's most popular collections, Poptastic. The collection features awesome bright neons (and was actually the collection that got me into Color Club in the beginning).

Well with Color Club's new look comes 6 exciting new shades in the Poptastic collection, which I'm reviewing for you today! The new shades are all neons with shimmer. Absolutely stunning - and all in two coats (without any white beneath).

First let's check out the nail art I did for it. I'm calling this the "lava lamp mani", because the way the blobs run together without joining reminds me of a lava lamp.


Admit it...you had a lava lamp...and you wish you still did. Mine was red, which looking back, kind of reminds me of blood. Creepy...but I'd still turn it on.

I got the idea for this technique straight from a tutorial by My Simple Little Pleasures. She's calling it a "blobbicure" which describes it quite nicely as well. To learn how I got the look, watch her video!

Ok...let's look at the new Poptastic colors!

Punk Rock Rings from Born Pretty Store

Today's manicure is inspired by the punk skulls and painful piercings of punk rock culture (or at least how it's embodied in my mind).


Born Pretty Store, the well-stocked e-tailor of fashion accessories including a huge variety of nail art supplies, sent me a set of rhinestone studs and gold rings. They roll together in a nail art wheel, and the rings can be pried apart to pinch around the tip of your nail, faking a pierced look.


I wouldn't actually wear these anywhere, but I'll wear them for the art of the look!

I hand painted the skull (using this design as a guide) using black polish and a tiny detailing brush I picked up at Sally's. The neon polish underneath is OPI's new one, Life Gave Me Lemons.

This nail art wheel is available for $3.95 from Born Pretty Store (10% off with my coupon code C10X31), and shipping worldwide is FREE! No excuse not to give it a try.

What do you think of the punk rock rings? Are they too impractical for you, or would you give them a try sometime? I know I certainly couldn't regularly rock them, but might pull them out come Halloween!

These products were sent to me by Born Pretty Store. The reviews are based entirely on my experience with the products and were in no way influenced by anyone.

Bundle Monster 3D Nail Metal Cabochons Review

As the nail world evolves, 3D nail decorations have become more popular and less isolated in specific nail communities. One of the easiest ways to get this growing trend is to glue on a full-nail metal decoration, like these awesome jewels from Bundle Monster.

I'm reviewing two, but they're very similar. They're about the size of a dime, if that helps with sizing them to your own nail.

Bundle Monster cabochon on top of a US dime

For this look, I just laid them on a wet top coat and let it dry. That won't hold them well at all though, and you'll likely lose them and be very sad about it. A better way to adhere them to your nail is to use nail glue on your natural nail. An even better and more secure way is to use acrylic, but if you're not sure how to use acrylic, just stick with glue.

I snazzed up these simple manicures so easily with the metal embellishments.


The first manicure uses Orly Saturated and essie Good as Gold. I hand-painted the gold designs to mimic the pattern in the cabochon. Here's a link to purchase this cabochon, which comes in a pack with 2, for $1.98.


I used this $1.99 cabochon set for my second manicure. The pink polish is Orly Neon Heat, and it's framing OPI My Favorite Ornament (outlined in black).

So if you're interested in trying the 3D look, this is a great way to wow!

To browse all of Bundle Monster's 3D decorations, click here.

These products were sent to me by Bundle Monster. The reviews are based entirely on my experience with the products and were in no way influenced by anyone.

Summer Neon Leopard Gradient Tutorial for Divine Caroline

Screw Spring. I'm tired of this hot-cold thing, so let's skip all that and head right into Summer.

Okay, so really this nail art works for both, but I'm anxious for warm weather!

Get your nails swimsuit ready with this hot neon gradient and leopard look I created for Divine Caroline today!


Color Society - Ruby Wing Groupie and Summer Love

Click the icon to visit the Color Society page.
Ready for more magic sunlight color changing polish from Ruby Wing? It remains a mystery how the transition happens, and how it's possible to get it while still getting such a good polish, but the fairies and unicorns over at Ruby Wing nailed it again with new polishes, Summer Love and Groupie, paired together here with some rhinestones.

Indoor

Outdoor

Indoor
Indoor
Summer Love starts neon orange. And it's a great neon. No underwear needed here! And it's only three coats. I love the neon orange part of this, but it transitions into something I'm not a huge fan of. 

Outdoor
Outdoor

It goes brown! It's a nice shade of brown, but what I don't like about it is how different it is than its neon counterpart. The nail art I created with the two polishes worked pretty well, but picture a design that used the neon orange with a neon purple. That'd be pretty right? Now picture that same look, but with brown and neon purple. Just not as good. 

Indoor
Indoor

Groupie is a great polish though! It starts neon pink...

Outdoor
Outdoor

...and ends a little less neon, and a little more red, but still very bright and noticeably different nonetheless. I only needed three coats for this polish as well.

This solar witchcraft is so strange, but it's awesome and unique, and the collection just keeps growing! Thanks again to Color Society for letting me be a part of the network.

Are you interested in applying to be part of the Color Society? Fill out the application here to apply!


These products were sent to me by Color Society. The reviews are based entirely on my experience with the products and were in no way influenced by anyone.

AA Floral

I'm sure you've seen the floral designs by mrcandiipants recreated all over the place. Jumping on that band wagon, and equally as motivated by her love for American Apparel polishes, here's some American (Apparel) Floral nails!

This was an impossibly easy look to create. Simple tools and even shaky hand skills are all you need for the look. (I obviously did roughly outline the flowers with a striping brush and black polish, but even that can be messy.) I love the way you can just dab the leaves petals onto the nail without the perfection of some other designs.


Also check out that color combo! Peach and neon? This combo of nude/neon is really trendy right now, though it's going into pastels as it's technically spring. My neon is Neon Green and my peach is Summer Peach, both from American Apparel.

I'd like to accumulate all the American Apparel colors throughout my lifetime. Is that possible without going broke? Maybe I'll start a Polish Piggy Bank, and save up some money every day until I have enough for them aaaaallllllllll!

Color Society - Color Club Brights

Click the icon to visit the Color Society page.

Did you know I'm a member of the Color Society? This network of bloggers is sent out monthly samples of Color Club and Ruby Wing products to review, test, and share with everyone. Over a month ago, I was sent my first sample, which included six polishes, two of which I'll show you tonight. The other four need sunlight, so my usual 11:00pm posts won't cut it for those.

These first two colors are both creme polishes from Color Club: Wild Cactus and Flamingo. The Color Society knows what's up, because these colors rock and they complement each other perfectly, which bodes well for my nail art, which I have to show off first.


I added some neon yellow (Funky Yellow from Kleancolor) to the look to really make the two colors pop even more loudly than they do solo. Everything was done freehand, mixing up the sizes, colors, and directions of the triangles and their color blocks to keep it interesting.

On their own they're stunning as well, and their coverage was great! I have Flamingo on my toes, but let's not start sharing more pictures than I need to or you want me to.

Let's take a look at them on their own.


Flamingo is a neon pink, but it's not a hot pink. It's more of Barbie's shoes, which may be why I was inspired to put it on my toes. It's got fantastic coverage, getting the job done with just two here.


Wild Cactus is a dark teal leaning more green than it does blue. This also covered in two simple coats.

So that's the first installment of the Color Society posts. I've got some glitters and holos coming as well, plus who knows what else in the future!

Interested in applying to be part of the Color Society? Fill out the application here to apply!


These products were sent to me by Color Society. The reviews are based entirely on my experience with the products and were in no way influenced by anyone.

Summer Vegas Nails

This weekend was a whirlwind. I spent it in the warm summer Vegas sun with good friends. Knowing I would be in my bikini all weekend, I wanted some super bright summer nails.

I snapped an Instagram picture before the chlorinated pools destroyed most of the look.

I used Funky Yellow (Kleancolor) and Jackie Oh! (Color Club) on top of My Boyfriend Scales Walls (OPI). Then I striped with a black striping polish.

Now I just have to track down the sandman, I'm sure he's mad at me for this weekend's lack of sleep!

Kleancolors from MyWholesaleFashion.com Reviews and Swatches

Kleancolor is a brand I've seen a lot of glitters from, and I've never seen in stores. I was contacted by a company called MyWholesaleFashion.com about doing a review of their site though, and was pleasantly surprised to see a whole stock of Kleancolor...well...colors...to choose from.


In addition to Kleancolor polishes, they carry Nabi, Profusion, and Santee. No, I've never heard of any of those, and I didn't pick any to do a review of for you today. Instead, I chose a wide selection of Kleancolors to showcase.

MyWholesaleFashion.com also carries makeup products, jewelry, and other accessories you may want to buy in bulk. They also have a few stamping kits for nails, as well as bulk orders of nail glue and nail art bits and baubles like rhinestones. I didn't notice these before, but it seems their inventory is expanding a bit. I've added them to my Where to Shop page, so make sure to check that out for other great places to build your nail army.

Anywho, onto the Kleancolors.

Overall, I'd say the formula for Kleancolor is hit and miss. For example, the neon yellow you're about to see was streaky but thick. And then the pastels were much easier to work with. The glitter was also very full, but the base gave me problems. However, it is a cheaper brand, and I do like their color selection. The creme polishes seem to be pretty consistent, so I would recommend buying those.

I don't have a whole lot to say about each color, so this will be a short-ish review.

First up, the polishes I didn't swatch individually. 11 polishes to swatch in one night is a lot, so instead, I combined five different pastels from Kleancolor into on patchwork nail art design.


Featured are Pastel Orange, Pastel Purple, Pastel Teal, Pastel Yellow, and TLC. I really love this nail art! The cremes were easy to work with too. They're not as vivid as Lime Crimes, which are my favorite pastels right now, but they're close! The black is Raven from Zoya.


Funky Yellow. It took 4 coats and still wasn't perfect, and it was definitely thick. Definitely the most problematic of the polishes in this set. I suggest using an undercoat of white if you do use this. I regret not.


Concrete Grey. It comes off a little blue due to my lightbulb. It's not quite as blue in real life. This was two coats, and it applied really well. I liked this one a lot. I imagine it's good for stamping, though I haven't put it to the test.


Fashionista. I'm sorry...who? I don't consider the army colors to be the most fashionable, nor do I associate this particular color with anything particularly glamorous. In fact, I'd say if you think hard enough, you could recollect a sick dog or a poopy diaper and know exactly what color I'm describing. Definitely unique to my collection! This was two coats.


Grande Finale. Holographic bar glitter. Really pretty but damn troublesome. This won't last long on your nails. It's like needing to pluck that annoying nose hair right out of your boyfriend's nose...but with glitter...on your nails.


Holo Chrome. What's up with the naming Kleancolor? This is not chrome, but it definitely has holo! I made the focus slightly off for the image so you could get the holo effect a bit. I liked this three-coater holo, but I HATED the brush. It was huge and strangely shaped. Like on the manufacturing line it went in at a weird angle and just never got fixed. Shame, it's a beautiful color!


Pastel Blue. This is different than Pastel Teal (used in the patchwork nail art) because it's more grey. I wouldn't call the 'teal' teal though. The pastels are all gorgeous in their own right, and only need 2-3 coats.

You can get Kleancolors like these from MyWholesaleFashion.com. Be wary of the packaging that the polishes are shipped in however. I've seen several other blogs purchasing from this site with horror stories, and I just consider myself lucky my bottles didn't break. It sounds like replacements are always given, but I think they just need to switch the packaging. Everything arrives in a box with a few pieces of bubble wrap loosely laid out. I had 3-4 layers of bubble wrap, with a few bottles between each layer. Each bottle was not individually wrapped, which is just begging for breakage, so hopefully that changes.

These products were sent to me by MyWholesaleFashion.com. The reviews are based entirely on my experience with the products and were in no way influenced by anyone.