

Showing posts with label guest post. Show all posts
Showing posts with label guest post. Show all posts
Creepy Cracked Halloween Nails for Divine Caroline
Tonight's Halloween nail art look offers an option outside the realm of adorable pumpkins or gorable pus. Take a crack at this look for something different this Halloween.

Hawaiian Hibiscus Flower Tutorial for Divine Caroline
Another tutorial for Divine Caroline today! It's actually been up a while, but now's the perfect time to try it as you bid summer adieu!

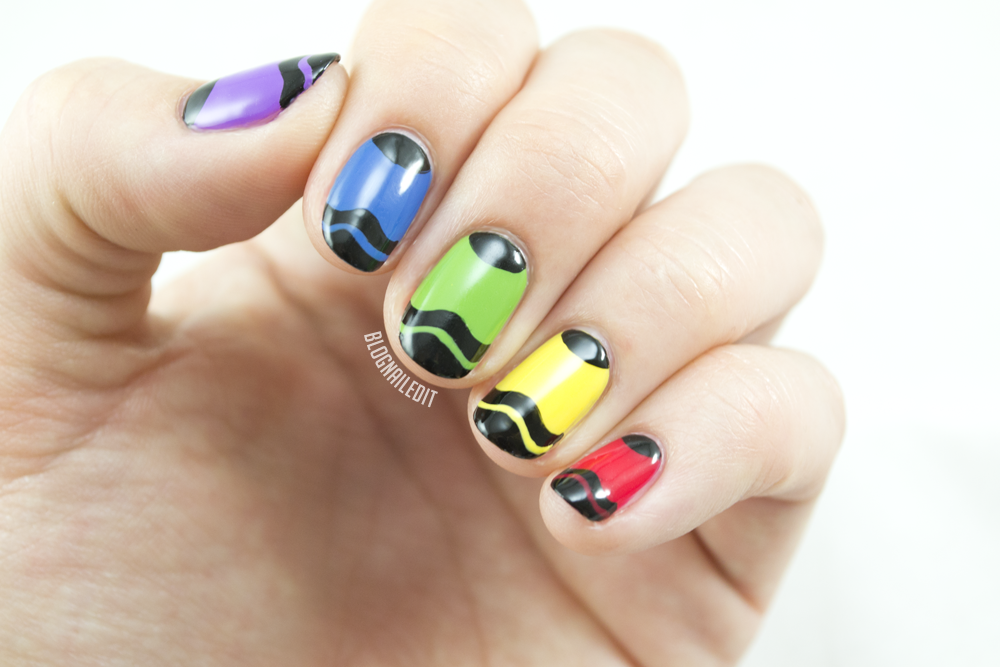
Crayon Nail Art for Divine Caroline
Nothing says "back to school" like a box of crayons. Give your tips a
sentimental finish with this nail art tutorial inspired by a childhood
favorite...crayons! My craft corner was always stocked with them, so it's no shock I grew up to continue the art in another medium.
Damask Nails for Divine Caroline
I know I've been pretty quiet on here, but that's because there's big things in the works. This year, I'll be in Las Vegas for Cosmoprof, North America's biggest beauty convention. I'll be shmoozing with the best of them, your favorite nail companies and bloggers. I can't wait!
In the meantime, here's another tutorial in collaboration with Divine Caroline.

In the meantime, here's another tutorial in collaboration with Divine Caroline.
Luxe of the Irish Tutorial for Divine Caroline
St. Patrick's Day means different things to different people, and at different ages. In elementary school, it was a reason to pinch your crush. At my age, it's a reason to go have more drinks during the day than at night. For others, it means something much more significant.
Either way, wearing green seems to be the persistent rule, and for us, that means green nails! I took it up a level and created this sophisticated green look for Divine Caroline.

Either way, wearing green seems to be the persistent rule, and for us, that means green nails! I took it up a level and created this sophisticated green look for Divine Caroline.
Spring Bouquet Tips - Tutorial for Divine Caroline
Tonight, head over to Divine Caroline for the steps, tools and fabulous colors to get this easy spring bouquet French!

I personally can't wait to try this again with brighter colors!
Click here for the guest post at Divine Caroline!
I personally can't wait to try this again with brighter colors!
Click here for the guest post at Divine Caroline!
Easy Rainbow Nail Art for Divine Caroline
Check out today's colorful tutorial for Divine Caroline!
I'm showing you how to make an impossibly easy rainbow look like the one below.

Pop over to my Divine Caroline guest post for the products and techniques used.
I'm showing you how to make an impossibly easy rainbow look like the one below.
Pop over to my Divine Caroline guest post for the products and techniques used.
Guest Post at Work Play Polish
I'm back! I enjoyed a brief vacation away from the winter cold of Colorado, and traveled to sunny Southern California to visit my family as well as Andy's family. I'm now about 20 pounds heavier after indulging in the luxuries of real Mexican food, and I'm eager to get back to blogging!
I'll start things off slow, with a sneak peek of a guest post I did for Leslie at Work Play Polish!
She asked some of her (and my) favorite bloggers to participate in a series of guest posts geared around the holidays.
Additionally, and more importantly, she had us do these for a good cause, Polished Girlz. This organization travels to hospitals around the country, where girls of all ages and various levels of health are treated to a manicure in their hospital rooms. The importance of hygienic manicures is taught to these girls, by other girls, and I'm thrilled to have been a small part of it!
Visit Work Play Polish for the full guest post and mani, but here's a blurry sneak peek to tantalize you.

I'll start things off slow, with a sneak peek of a guest post I did for Leslie at Work Play Polish!
She asked some of her (and my) favorite bloggers to participate in a series of guest posts geared around the holidays.
Additionally, and more importantly, she had us do these for a good cause, Polished Girlz. This organization travels to hospitals around the country, where girls of all ages and various levels of health are treated to a manicure in their hospital rooms. The importance of hygienic manicures is taught to these girls, by other girls, and I'm thrilled to have been a small part of it!
Visit Work Play Polish for the full guest post and mani, but here's a blurry sneak peek to tantalize you.

My Guest Post on the French Blog, Maoya
Good morning and happy Monday everyone!
This past Saturday, I had the pleasure of presenting some nail art and health tips on a French blog called Maoya. Its author, Orane, asked me to create a fun nail look as well as offer some tips for nail care. She even took the time to translate my words into French.
Here's a sneak peek of the look, but for the entire look, visit Maoya here. Check out the rest of her nail art as well. Her photography and poses reminds me of pshiiit, so if you like her, then you'll love Orane!

Thank you for the opportunity Orane!
Interested in having me do a guest post on your blog, or want to post one on mine? Get in touch with me and we can chat about it! Email me at blognailedit@gmail.com!
This past Saturday, I had the pleasure of presenting some nail art and health tips on a French blog called Maoya. Its author, Orane, asked me to create a fun nail look as well as offer some tips for nail care. She even took the time to translate my words into French.
Here's a sneak peek of the look, but for the entire look, visit Maoya here. Check out the rest of her nail art as well. Her photography and poses reminds me of pshiiit, so if you like her, then you'll love Orane!
Thank you for the opportunity Orane!
Interested in having me do a guest post on your blog, or want to post one on mine? Get in touch with me and we can chat about it! Email me at blognailedit@gmail.com!
On Beauty High: Plaid Tutorial

Perfectly pretty plaid is everywhere this summer, and my version of plaid nails are available at Beauty High with a tutorial!
What I especially love about plaid is that you can reuse it in the winter, with your darker shades instead of these bright summers.
Here I used two of the new China Glaze jellies from the Sunsational collection (Keepin' It Teal and Shell-O). But for the winter, you could try darker jellies, like those from the Zoya Gloss collection (Fall 2012).
For the full tutorial, head over to Beauty High for my guest post. I think you'll really love this one!
On Beauty High: Crosshatched Tutorial
Stop by Beauty High today to see another neato tutorial for some sweet geometric nails in my guest post, Awesome Nail Art Idea: The Crosshatched Manicure!


The colors I used are both subtle, so the gradient itself is subtle, but you can punch it up to any mix you prefer. Don't limit yourself to just two colors either if you don't mind the cleanup. I decided to use Blu (Zoya) and Something Sweet (China Glaze).
The full tutorial is available on Beauty High here, and I'll be teamed up one more time for Manicure Month this July with Beauty High, so keep an eye out for more!

Guest Post at Globe & Nail
Hey there! Today's post can be found and enjoyed over at Globe & Nail. Emma's asked me and several other bloggers to fill up her's while she's gone!

Guest Post from Tips and Topcoat
Happy New Year! Can you believe it's 2013 already?! It's so strange to think I graduated from college almost three years ago now.
To celebrate the New Year, I'm making a resolution to you all to get some really interesting and stunning nail art out at least once a month. Hopefully more, but let's be practical for sanity's sake.
What better way to celebrate this resolution than with the most detailed nail art of this week's guest posts. These unbelievable Rainbow Brite nails were done by Lou from Tips and Topcoat. Wow!
Hey everyone *wavesss*
First off I want to say a huge thank you to Katy for allowing me to be a guest poster for her & you all.
It's a great honour and I hope I do well. :)
I thought I would show you one of my more detailed art pieces, Rainbow Brite And The Sprites.
I wasn't sure on who or what this was when I got a request, so please Google if you are not sure either. :)


For my base colour I used Color Club Cloud Nine, the design itself is all done using acrylic paints. I'm rather pleased on the outcome & I hope you all agree.
Thank you again Katy xx
Lou - tipsandtopcoat.blogspot.com
Thank you so much Lou! Your work is truly amazing and gives us all something to try for in the New Year!
Be sure to check out Tips and Topcoat for more of this kind of truly stunning detail in nail art!
To celebrate the New Year, I'm making a resolution to you all to get some really interesting and stunning nail art out at least once a month. Hopefully more, but let's be practical for sanity's sake.
What better way to celebrate this resolution than with the most detailed nail art of this week's guest posts. These unbelievable Rainbow Brite nails were done by Lou from Tips and Topcoat. Wow!
Hey everyone *wavesss*
First off I want to say a huge thank you to Katy for allowing me to be a guest poster for her & you all.
It's a great honour and I hope I do well. :)
I thought I would show you one of my more detailed art pieces, Rainbow Brite And The Sprites.
I wasn't sure on who or what this was when I got a request, so please Google if you are not sure either. :)


For my base colour I used Color Club Cloud Nine, the design itself is all done using acrylic paints. I'm rather pleased on the outcome & I hope you all agree.
Thank you again Katy xx
Lou - tipsandtopcoat.blogspot.com
Thank you so much Lou! Your work is truly amazing and gives us all something to try for in the New Year!
Be sure to check out Tips and Topcoat for more of this kind of truly stunning detail in nail art!
Guest Post from Finger Painted
Happy (or is it Merry?) New Year's Eve everyone! I love New Year's Eve, as it always gives me a good excuse to get dolled up for no real reason other than to party!
For today's guest post, I thought the most appropriate nails were these ultra-blingy nails from Lexi at Finger Painted. I love these so much!
Hey everyone! I'm Lexi from Finger Painted. I was so excited to be one of Katy's guest posters! I wasn't sure what I wanted to do at first but Katy said she'd love something blingy and glitzy for New Years...so out came the rhinestones!

I used China Glaze White on White and painted the black shapes with acrylic paint. I sealed it all in with 2 coats of Poshé and then used some nail glue to stick on all of my studs and stones to make sure they stay put. The little black ones are from a nail wheel from icing. I was shocked they actually had some really cool nail art accessories! The larger silver stones are from Poochiez Nail Art Boutique and I don't remember where the other ones came from. Haha.

These were partially inspired by one of my new phone cases (purchased here). I didn't have the right colors stones to match it exactly so I just went with black and white.


Thats all for my post! If you want to come visit me I'm on Blogger, Tumblr and Instagram!
Thanks again to Katy for having me!
●Lexi●
Oh Lexi that was fabulous! I wish I had time to do my nails like that for New Years!
For today's guest post, I thought the most appropriate nails were these ultra-blingy nails from Lexi at Finger Painted. I love these so much!
Hey everyone! I'm Lexi from Finger Painted. I was so excited to be one of Katy's guest posters! I wasn't sure what I wanted to do at first but Katy said she'd love something blingy and glitzy for New Years...so out came the rhinestones!
I used China Glaze White on White and painted the black shapes with acrylic paint. I sealed it all in with 2 coats of Poshé and then used some nail glue to stick on all of my studs and stones to make sure they stay put. The little black ones are from a nail wheel from icing. I was shocked they actually had some really cool nail art accessories! The larger silver stones are from Poochiez Nail Art Boutique and I don't remember where the other ones came from. Haha.
These were partially inspired by one of my new phone cases (purchased here). I didn't have the right colors stones to match it exactly so I just went with black and white.
Thats all for my post! If you want to come visit me I'm on Blogger, Tumblr and Instagram!
Thanks again to Katy for having me!
●Lexi●
Oh Lexi that was fabulous! I wish I had time to do my nails like that for New Years!
Guest Post from Refined & Polished
I'm having a lovely vacation everyone, but I can't wait to get back to posting my own nails for you all to enjoy! I've been thinking about it the whole time, and I'm anxious to start putting the designs in my head down into nail form.
In the meantime, here's another fabulous guest poster. Tonight, it's a design from Lakeisha at Refined & Polished. Check it out!
Hey dolls! It is my pleasure to provide a guest post on Nailed It today, as Katy does some of the most amazing nail art. I wanted to combine my two favorite types of nail art for this post, stripes and dots. While reviewing some Mentality holos last week, I thought that Entice and Seduce would make a great combination. I started with two coats of Entice, a brown polish with subtle holo shimmer. Next, I used striping tape to create a design on my index and pinkie fingers. I polished over the tape with Seduce, a gorgeous blue holo. After removing the tape, I added several dots of Seduce for a double accent nail.


I love the way this turned out! The colors go together perfectly and I love the subtle holo effect. I hope that you all have enjoyed this post while Katy vacations. Happy holidays!
Thanks so much for the holographic eye candy, Lakeisha! You can see more of these stunning nails and the art that adorns them over at Refined & Polished, so make sure you stop by.
In the meantime, here's another fabulous guest poster. Tonight, it's a design from Lakeisha at Refined & Polished. Check it out!
Hey dolls! It is my pleasure to provide a guest post on Nailed It today, as Katy does some of the most amazing nail art. I wanted to combine my two favorite types of nail art for this post, stripes and dots. While reviewing some Mentality holos last week, I thought that Entice and Seduce would make a great combination. I started with two coats of Entice, a brown polish with subtle holo shimmer. Next, I used striping tape to create a design on my index and pinkie fingers. I polished over the tape with Seduce, a gorgeous blue holo. After removing the tape, I added several dots of Seduce for a double accent nail.


I love the way this turned out! The colors go together perfectly and I love the subtle holo effect. I hope that you all have enjoyed this post while Katy vacations. Happy holidays!
Thanks so much for the holographic eye candy, Lakeisha! You can see more of these stunning nails and the art that adorns them over at Refined & Polished, so make sure you stop by.
Guest Post from Globe & Nail
Today's guest post comes to you from a beautiful ballerina with beautiful nail art. Her perfectly shaped nails are indeed real, and so is her talent. Check out Emma from Globe & Nail!
Hi, I'm Emma from Globe & Nail! I'm so excited to be guest posting for Katy today, I love her blog and I hope that you all enjoy what I've put together! I've really been loving Katy's Holographic Holidays posts recently, so inspired by that, I created this manicure!

I started with two coats of NailNation 3000 Eve #403, and then free-handed the snowflakes with white acrylic paint. Topped with two coats of Seche Vite to smooth it all out.

I love how each snowflake is a little different, and Eve #403 provides the perfect wintery backdrop with the subtle linear holo and chunkier scattered holo. The freehand snowflakes are very eye-catching, my friends and family (who keep up with my nail goings-on) all thought that they were stamps, haha!

I'm really happy with how this turned out, the overall look is very seasonally appropriate! We had a good dump of snow a couple days ago here in BC, but it's all melted now. I'm really hoping we'll get a white Christmas!
Thank you so much for having me on your blog Katy; I hope you and your readers enjoy my manicure! Merry Christmas! :)
Aw, how sweet Emma! I wish you a (belated) Merry Christmas as well! Spending my vacation in California has been a nice break, but I'm ready for some snow soon in Colorado. Hopefully I can catch snowflakes as beautiful as these some snowy night.
Be sure to check out and gawk at Globe & Nail for some really high-quality nail art and pictures!
Hi, I'm Emma from Globe & Nail! I'm so excited to be guest posting for Katy today, I love her blog and I hope that you all enjoy what I've put together! I've really been loving Katy's Holographic Holidays posts recently, so inspired by that, I created this manicure!

I started with two coats of NailNation 3000 Eve #403, and then free-handed the snowflakes with white acrylic paint. Topped with two coats of Seche Vite to smooth it all out.

I love how each snowflake is a little different, and Eve #403 provides the perfect wintery backdrop with the subtle linear holo and chunkier scattered holo. The freehand snowflakes are very eye-catching, my friends and family (who keep up with my nail goings-on) all thought that they were stamps, haha!

I'm really happy with how this turned out, the overall look is very seasonally appropriate! We had a good dump of snow a couple days ago here in BC, but it's all melted now. I'm really hoping we'll get a white Christmas!
Thank you so much for having me on your blog Katy; I hope you and your readers enjoy my manicure! Merry Christmas! :)
Aw, how sweet Emma! I wish you a (belated) Merry Christmas as well! Spending my vacation in California has been a nice break, but I'm ready for some snow soon in Colorado. Hopefully I can catch snowflakes as beautiful as these some snowy night.
Be sure to check out and gawk at Globe & Nail for some really high-quality nail art and pictures!
Guest Post from heartNAT
You may remember my nail crush post from a bit ago. Half of that post was in honor of Natalie at heartNAT. I'm so excited to have her on Nailed It today to share with you guys!
Hi lacquer lovers! I'm Natalie from heartNAT. When Katy posted on her Instagram asking if anyone was interested in doing a guest post on her blog, I hesitated a bit at first before contacting her. I wasn't sure my nails would live up to her expectations, but I've been challenging myself lately so I decided to go for it! I decided to do some Koi fish nails with one of my unused nail plates. I'm glad I had something special saved up for this special occasion. I started off with a base of Zoya Purity and then I sponged on random spots of Zoya Myrta and OPI Goldeneye. I stamped using A48 (Koi fish) and MASH 39 (scales) in Konad Black. I'm not sure what brand the A48 nail plate is because I got it off of eBay, but isn't it awesome? The first time I saw it used I knew I had to have it!

blog.jpg)
Hope you all like this Koi fish nail art and thanks to Katy for having me!
<3Nat
Thank you so much Nat for the awesome post. You always have such great stamping! Make sure you all check out heartNAT for more great nail art in the bright colors I tend to love most!
Hi lacquer lovers! I'm Natalie from heartNAT. When Katy posted on her Instagram asking if anyone was interested in doing a guest post on her blog, I hesitated a bit at first before contacting her. I wasn't sure my nails would live up to her expectations, but I've been challenging myself lately so I decided to go for it! I decided to do some Koi fish nails with one of my unused nail plates. I'm glad I had something special saved up for this special occasion. I started off with a base of Zoya Purity and then I sponged on random spots of Zoya Myrta and OPI Goldeneye. I stamped using A48 (Koi fish) and MASH 39 (scales) in Konad Black. I'm not sure what brand the A48 nail plate is because I got it off of eBay, but isn't it awesome? The first time I saw it used I knew I had to have it!

blog.jpg)
Hope you all like this Koi fish nail art and thanks to Katy for having me!
<3Nat
Thank you so much Nat for the awesome post. You always have such great stamping! Make sure you all check out heartNAT for more great nail art in the bright colors I tend to love most!
Guest Post from Nail A College Drop Out
Guest week continues with some long and juicy nails, and they belong to Briana at Nail A College Drop Out.
So here we are. You, me, and a blog entry. Seeing that I am not the usual author here; I should—at the very least—introduce myself, right? Right! (Insert cheesy name badge they make you wear at mandatory team meetings.) My name is Briana from Nail A College Drop Out. Now that we’re better acquainted, let’s get down to the reason everyone is here. Nail art.
A few months ago (and by a few I mean back In June) a friend suggested I do watermelon nails. As you can see quite a bit of time passed, but at least it got done. Can you hear the procrastination talking?


For the watermelon rind nails I started with a base of Barry M Mint Green as a base. Next, I random sponged on Barry M Spring Green. Finally, I used a fan brush to apply Wet n Wild Fast Dry SaGreena the Teenage Witch.

For the watermelon flesh I started with a base of Wet n Wild Fast Dry How I Met Your Magenta. Next, two coats of Icing Rave Royalty. Finally, on the thumb and middle finger, I applied some 1.5mm black studs I purchased from BornPrettyStore.com.
Why did I leave the ring finger stud-less? I felt the need to go to sleep. Thus, my ring finger represents a seedless watermelon. See folks! Procrastination isn’t always terrible.


Want more sarcasm and nail art? Visit me over at NailACollegeDropOut.blogspot.com and follow me on Twitter and Instagram!
Until we meet again.
Tune in. Drop out. Love polish.
P.S. Thanks Katy for letting me fill in for you!
Thank you Briana for the summery nails!
Be sure to check out Nail A College Drop Out for more long-nail-nail-art. I bet it's quite a change for readers to see such long nails! Wait till I return guys, you'll be seeing some little nails for sure. Moving stuff out of storage will do that to a girl.
So here we are. You, me, and a blog entry. Seeing that I am not the usual author here; I should—at the very least—introduce myself, right? Right! (Insert cheesy name badge they make you wear at mandatory team meetings.) My name is Briana from Nail A College Drop Out. Now that we’re better acquainted, let’s get down to the reason everyone is here. Nail art.
A few months ago (and by a few I mean back In June) a friend suggested I do watermelon nails. As you can see quite a bit of time passed, but at least it got done. Can you hear the procrastination talking?
For the watermelon rind nails I started with a base of Barry M Mint Green as a base. Next, I random sponged on Barry M Spring Green. Finally, I used a fan brush to apply Wet n Wild Fast Dry SaGreena the Teenage Witch.
For the watermelon flesh I started with a base of Wet n Wild Fast Dry How I Met Your Magenta. Next, two coats of Icing Rave Royalty. Finally, on the thumb and middle finger, I applied some 1.5mm black studs I purchased from BornPrettyStore.com.
Why did I leave the ring finger stud-less? I felt the need to go to sleep. Thus, my ring finger represents a seedless watermelon. See folks! Procrastination isn’t always terrible.
Want more sarcasm and nail art? Visit me over at NailACollegeDropOut.blogspot.com and follow me on Twitter and Instagram!
Until we meet again.
Tune in. Drop out. Love polish.
P.S. Thanks Katy for letting me fill in for you!
Thank you Briana for the summery nails!
Be sure to check out Nail A College Drop Out for more long-nail-nail-art. I bet it's quite a change for readers to see such long nails! Wait till I return guys, you'll be seeing some little nails for sure. Moving stuff out of storage will do that to a girl.
Guest Post from Popping Nails
Another great guest post today!
Charlie at Popping Nails sent over some fantastic nail art based on one of my favorite childhood series, Sesame Street!

Aren't they wonderful?
You can see more of the Popping Nails nail art by visiting her blog or Tumblr account.
Thanks again Charlie!
Charlie at Popping Nails sent over some fantastic nail art based on one of my favorite childhood series, Sesame Street!

Aren't they wonderful?
You can see more of the Popping Nails nail art by visiting her blog or Tumblr account.
Thanks again Charlie!
Guest Post from Base Coat Top Coat
Merry Christmas everyone! I hope your days were all full of love and happiness. Mine certainly was as this fantastic vacation continues.
Filling my vacation void have been some guest bloggers. This next guest post comes to you from Kelly at Base Coat Top Coat. Her Christmas themed nails seemed most appropriate for this Christmas guest post!
Hello All! I'm Kelly from Base Coat Top Coat (basecoat-topcoat.tumblr.com) and I'll be guest posting here today at one of my favorite Nail Art hot spots, NAILED IT! I hope you all like this Christmasy design! :)


CHRISTMAS TREE TOPPERS
These winter themed nails were inspired by the bright star atop the tree! They feature multiple color gradients, a cornered french and glitter polka dots!
I Used Love & Beauty - Taupe and Wet n' Wild - Caribbean Frost for the gradients. I then cornered off the tips using Caribbean Frost and highlighted the edge using Taupe, and did the opposite for the V-Gap on the center nail. Using Color Club - Gold Glitter Striper and Sinful Colors - Black on Black, I created the light rays for the star. The polka dots on the polka dot nails were made with Milani - Gold (glitter), which I sometimes prefer to use over loose glitter, because the polish coating the hex glitter will adhere to your nails without having to reapply a top coat to get them to stick. Lastly, I created a gradient using the same Love & Beauty - Taupe and Martha Stewart's gold craft glitter (my favorite glitter). I often will feature two statement nails in my designs - one as the "over the top" statement nail, and the other, a simpler form of the design or color palette to create a little visual rest while highlighting accent colors I may have used on other nails!
I want to thank Katy for letting me guest post on her site! This was my very first one ever and it was a lot of fun! I hope you all enjoyed it too! Have a Happy Holiday!
Kelly
Thank you Kelly for the great nail designs, and Merry Christmas to all!
Filling my vacation void have been some guest bloggers. This next guest post comes to you from Kelly at Base Coat Top Coat. Her Christmas themed nails seemed most appropriate for this Christmas guest post!
Hello All! I'm Kelly from Base Coat Top Coat (basecoat-topcoat.tumblr.com) and I'll be guest posting here today at one of my favorite Nail Art hot spots, NAILED IT! I hope you all like this Christmasy design! :)
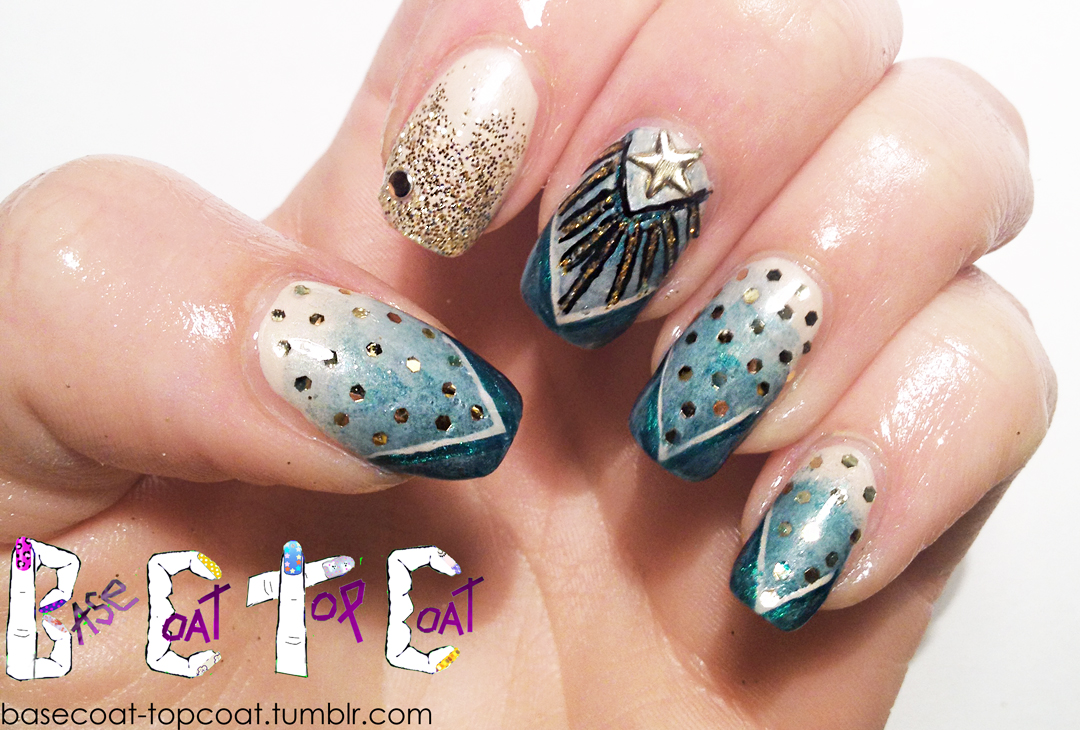
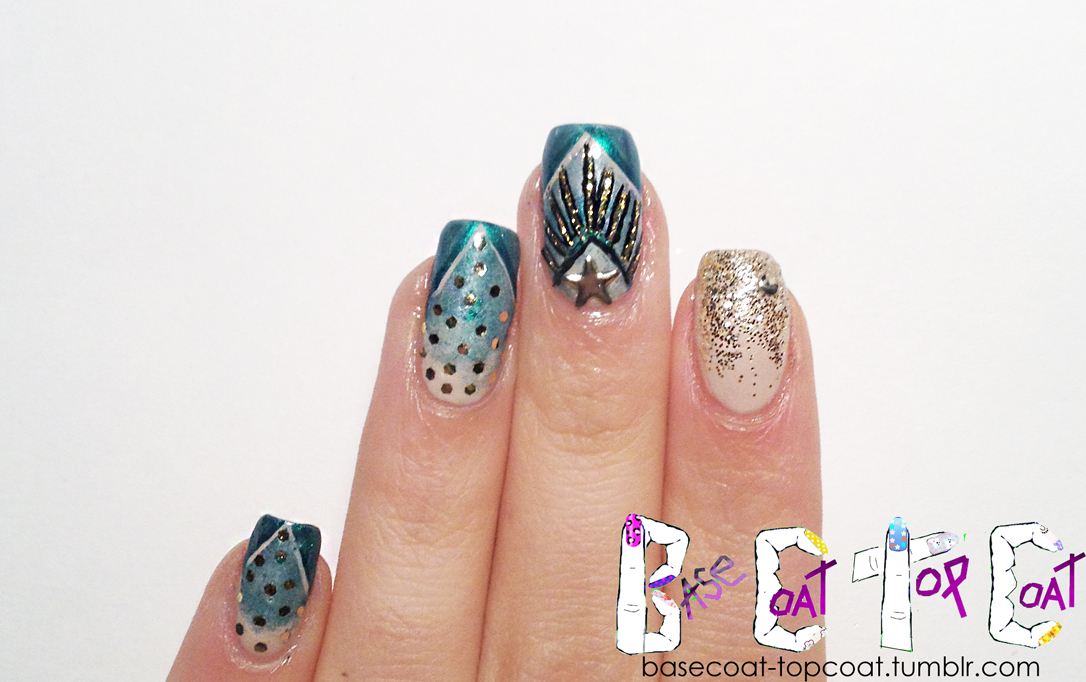
CHRISTMAS TREE TOPPERS
These winter themed nails were inspired by the bright star atop the tree! They feature multiple color gradients, a cornered french and glitter polka dots!
I Used Love & Beauty - Taupe and Wet n' Wild - Caribbean Frost for the gradients. I then cornered off the tips using Caribbean Frost and highlighted the edge using Taupe, and did the opposite for the V-Gap on the center nail. Using Color Club - Gold Glitter Striper and Sinful Colors - Black on Black, I created the light rays for the star. The polka dots on the polka dot nails were made with Milani - Gold (glitter), which I sometimes prefer to use over loose glitter, because the polish coating the hex glitter will adhere to your nails without having to reapply a top coat to get them to stick. Lastly, I created a gradient using the same Love & Beauty - Taupe and Martha Stewart's gold craft glitter (my favorite glitter). I often will feature two statement nails in my designs - one as the "over the top" statement nail, and the other, a simpler form of the design or color palette to create a little visual rest while highlighting accent colors I may have used on other nails!
I want to thank Katy for letting me guest post on her site! This was my very first one ever and it was a lot of fun! I hope you all enjoyed it too! Have a Happy Holiday!
Kelly
Thank you Kelly for the great nail designs, and Merry Christmas to all!
Subscribe to:
Posts
(
Atom
)