Bundle Monster Holiday Plate Review - Cinco de Mayo Plate

Happy Cinco de Mayo...in September!

Bundle Monster's holiday stamping collection has all sorts of interesting holiday choices, including a Cinco de Mayo plate! I literally laughed out loud when I was flipping through the plates, so I absolutely had to use this one. I went full Mexican with this as you can see!


The plate comes with the two stamps I'm showing here, as well as a cactus, maracas, a Southwestern style sun, and the text "cinco de mayo". Marta at ChitChatNails took a great shot of it here:

Photo courtesy of Marta of ChitChatNails

How cute is that plate? I will definitely remember it come next Cinco de Mayo! It's a holiday I am certain I don't celebrate traditionally (as you can see by my last Cinco de Mayo post), but it's all good and fun.

The colors I used in my mani were Milani's Tainted in Red and Yellow Mark, which are both textured polishes. I also used a base of Purity (Zoya) and stamped with Posh (Revlon) and Tasmanian Devil Made Me Do It (OPI), which made the stripes of the Mexican flag as well.

You can pick up the entire Bundle Monster holiday collection of 25 plates on their site for $21.99.

Bundle Monster also recently released a collection where users turned in and had their own designs created on plates! That collection of 26 plates runs at $16.50 here.

Check up with them on Facebook, Twitter, Pinterest, Instagram, and Google+!


These products were sent to me by Bundle Monster. The reviews are based entirely on my experience with the products and were in no way influenced by anyone.

#NailTechNailedIt Weeks 5 through 7

Weeks after the first few start to blend together in Beauty School, especially with a pretty catastrophic flood breaking everything up. In total, I missed four days of class because of the flooding events, but we're back now, and slowly getting back into the swing of things.

Before the flood all began Wednesday night, I performed my first set of gel enhancements, again on my wonderful model Clare. It took forever...I think we racked up three hours. Ultimately, neither Rachel or I were very happy with the final results:


Chunksville USA!

When we returned to school almost a week later, we talked about it with Concha. She identified some of our key problems, which included placing the tips (the white parts of her nail you see there) too far down near our clients' cuticles. If you place them too far down, there's more tip that's required to adhere to the natural nail, and that leaves more room for lifting.

I also hate the way they're leaning toward being duck feet. I was forcing the tips onto her nails, even though they were too small, so they splayed out too wide and I didn't file them evenly along the side walls.

Finally, the chunky, uneven bumps you see on most of them is a major result of a) not removing the ridge between tip and natural nail and b) not removing the ridges after finishing the service.

I wanted to see how a pro did it, on a real nail, so Concha did a few of my nails. She took her time and showed us how to properly glue, and also how to size the tips. Her technique made much more sense, and I easily saw what I did wrong.

Fast forward to yesterday. I did another service (on my friend Chloe this time) keeping all of these things in mind. I'm still unsure how the longevity of the service has improved (Clare's popped off in a few days) because Chloe didn't want to keep hers. But check out how much smoother, shallower, and more even they are!


Much better! Still not perfect by any means, but much better! Check out that pinky! I'm least happy with the hand on the right's ring finger, but I know exactly why. From the beginning, I sized it to be too small, which meant I had to put it farther down her cuticle to get it to stick. So the end result is a too-big white part, and more bumps to fight with.

Smoothing it all out was also much easier, as I found my niche in a buffer. Previously, I used a buffer that was too flexible, with too strong a grit. This time, I used the flip side of a file, which gave me more control, and a finer attention to detail.

Am I totally comfortable with UV gel enhancements? No, not by any stretch. But I am excited to see progress and improvement.

Theory-wise, we didn't do anything too exciting. We spent an ungodly amount of time on two chapters (anatomy and skin diseases), which I'm sure all you Milady textbook readers can attest to loathing as much as I do. Anatomy, while interesting, is extensive to an unnecessary degree. I understand that I need to learn more about the integumentary system, but what could I possibly need to know from the excretory system?

The best part of these past weeks was Saturday, when Chloe and Shayna came in for NAIL ART! I got to spend all day dolling them up in neons for an event we were all going to later. Here's the final looks they chose (though my camera was less than cooperative in capturing the real appeal).

Chloe's are actually a neon pink and neon yellow gradient, much brighter than shown.


Shayna's are a mishmash of neon colors with black, bold lines and studs. I gained inspiration for these from ChrissyAi's look.


What do you think so far of nail tech school? We're just about half way through the class portion of it all, and just have a few more chapters to go, and a few more services to learn, including the all-exciting acrylics and waxing (elbow to fingers and knee to feet).

BPS Half Pearl and Rhinestone Picker Review

Born Pretty Store is getting out of control in the best way possible. Anything I need, I can get there! And I love that I get at least 10% off with every order just by entering this coupon code: C10X31.

Today I tried half pearls for the first time. These 3D decorations are different than rhinestones. They're smoother, but they stick up about as far. The wheel I'm reviewing has five colors: white, baby pink, magenta, purple, and light blue.


They all go so perfectly together, and I liked the gradient of colors.


I matched up several polishes with the pearls' colors: Kieko (Zoya), Queenie in a Bottle (Sation), Gie Gie (Zoya), and Lady in White (Duri). I also added Electrical Storm (Sation) over my thumb and index finger to keep it shiny, just like the pearls.

This manicure, though a little complicated looking, was really easy to achieve! I used the rhinestone picker from BPS to place each pearl.


The rhinestone picker is a wax pencil that you sharpen like any other pencil or makeup pencil. The "lead" is actually wax, so it's slightly sticky. It makes picking rhinestones and 3D decorations impossibly easy and quick. I had to sharpen mine down to a ridiculous nub because apparently, it's got cat crack in it and it's irresistible to hungry felines. Jerks.

Pick your pearl wheel here for $3.55 and your rhinestone picker here for $1.99, and don't forget to use the coupon code for 10% off.


These products were sent to me by Born Pretty Store. The reviews are based entirely on my experience with the products and were in no way influenced by anyone.

Insidious Chapter 2 w/ Duri Cosmetics

I must be some kind of minor masochist, without all the sexual gratification. I sit myself down in front of polish fumes all day, and then at night, I subject myself to pitch darkness (with the exception of a few lit candles) and flip on scary movies. The scarier, the better.

Now that fall's officially here, that means the wave of scary movies is barreling down as well. One of the most anticipated horror flicks is Insidious 2. I've seen the first, and loved it. Though its demon was a little laughable, the jumps were definitely there, so I'll be paying for the second!

In addition, I'm satisfying my other guilty pleasure by showing you all some Insidious inspired nail art using polishes from Duri Cosmetics.

Duri released a line of 6 colors for the release of the film. Each color is perfect for Halloween! You can purchase any of the 6 colors here for $6. (One more 6 would be a bad omen right?) There's a ghostly white, a creepy green, and deep shades including an oxblood red, a shimmery deep blue, a pitch black, and a gravestone silver.

I didn't swatch any of the colors for you. I guess that's my trick for trick or treating. Duri sent me the polishes so I could create super scary nail art, so this was my whack at it!


Is it terrifying? Nah. But it gets the creepy factor across right?

And, it was awesome enough to be picked up by the editors of Nails Magazine and featured on Salon Fanatic! That excites me.

Thanks Duri, for the fun polishes to play with! I was totally inspired by the colors!

These products were sent to me by Duri Cosmetics. The reviews are based entirely on my experience with the products and were in no way influenced by anyone.

ROCOCO Mod's & Muses Collection Swatches & Review

No new news on the flood situation from my perspective. Which is good news!

More good news is that I have nail art and swatches to show you.

ROCOCO nail lacquer released a line of four 60's-inspired shades in their new collection, Mods & Muses.

Rock your nails this summer with the newest shades from ROCOCO. Inspired by the iconic styles of the 60's, ROCOCO's "Mods & Muses" collection draws on bright and bold shades reviving the statement hues of this groovy decade for a flower power collection.

60's style huh? Well more flower power to them! Here's the nail art to go with it!


Besides the base, which is OPI My Vampire is Buff, the colors are all from this collection, the first of which is Flower Child.


Flower Child is a lovely pale yellow creme. It's somewhat difficult to work with. I'm coming to terms with the fact that most, if not all yellows, are like that. Ugh. This yellow took 3 patient coats.


Bombshell is a dark but bright magenta. It's a quality I can't really describe, in that it's bright on the nail, but it's not exactly a bright color. I used 2 easy coats for this.


Flashback is another creme (they all are) that counts as coral, but is much more orange than the pink. This requires 2-3 coats, 3 if you're impatient like me.


The last color is called Kitsch, and it's a mint creme. It's the exact color of mint ice cream, which makes me almost as happy as mint ice cream does. Just like Flashback, it's a 2-3 coat polish that requires patience.

Overall, these polishes are great! The collection is cohesive and the cremes make me giddy.

You can buy these polishes at spacenk.com for $16.50 each. Pricey, yes. They're also available at select Bloomingdales. You can spot them in these precious boxes:

Photo credit: Vampy Varnish
These products were sent to me by ROCOCO. The reviews are based entirely on my experience with the products and were in no way influenced by anyone.

News Update

Photo credit: The Daily Camera

If you follow me on Twitter (or have been reading my feed in my sidebar of this blog), then you know that I live in Boulder, and there's national disaster level flooding in Boulder and the surrounding canyons and towns. Since Wednesday night, we've been receiving alerts of flash flood warnings as the unrelenting rain poured from the sky. Around 2:00 AM, my friends called out for help as they were evacuated from their condo. Their second-level unit was not directly affected, but as you can see from their video, they were in serious danger. They are both safe and dry and staying with friends until it is safe for them to return.

Andrew and I are both safe and dry. Our house is on high ground in Boulder, and no water damage has occurred for us. We are extremely lucky, as houses all around us are having to rip up their basements' carpet and shop-vac out inches of water.

The once peaceful and picturesque Boulder Creek has become a raging river, tearing the banks of it out. The creek has widened substantially and the water flow has gone from dry in some spots to 5,000 cubic feet per second at its peak so far.

Looking out my window now, I can see patches of blue sky, which is reassuring and welcome. This doesn't provide much comfort for those along flood plains though. Thousands of residents were evacuated and some remain trapped in their current conditions. Evacuations are aided by the National Guard, but with such dangerous conditions, it's a slow process.

The school I attend for my nail tech license has been closed since Thursday. I'm unsure if it will reopen for Tuesday's classes yet. 

Again, we are fine and safe. I wanted to let everyone know what has been happening. 

In other news, I did not win the InStyle Social Media award for Most Inspiring Manicure. That award went to MissJenFabulous on YouTube. I'm disappointed, as I was ahead at some point, but her following is much larger than mine. Oh well! Congratulations to her, and thank you to all those who voted!

For the most updated news on what's happening in Boulder and Colorado, I recommend checking the Twitter hashtags #BoulderFlood and #COFlood. Looking at the pictures is terrifying.

If you want to help, our local paper, The Daily Camera, has a post detailing ways to help here.

#NailTechNailedIt Weeks 3 and 4

As I'm entering my 5th week of school, I realize I've shorted you all two weeks worth of posts on nail tech school! It's taking over my life...but I couldn't be happier about it. The two weeks sort of blend together at this point, but I'll cover the basics for you. Stay tuned till the end to see some pictures I know will excite you!

And while I've got you, please please please go vote for me as the Most Inspiring Manicure! You can vote as many times as you want just by refreshing the page, and I need all the votes I can get to beat the current leader, MissJenFabulous from YouTube. If you like my original tutorials, please show your support, you have until Sunday the 15th at 11:59 pm ET. Vote here!

In weeks 3 and 4, we really ramped up our learning. Here's what we covered in-class:
  • Pedicures
  • Gel enhancements
  • Wraps
  • Basic chemistry
This rapid fire learning of new stuff was a lot to remember, especially since it's all so new to me. This is the time in school where I know I need to focus to get everything down I need without getting overwhelmed.

Pedicures are a whole different kind of monster compared to their fingertip counterparts. I've given several pedicures since testing out of them. At this point, upon graduation, I don't think I'll continue giving them if I can avoid them. Feet are just not something I enjoy, no matter how well someone takes care of them. There's a lot of questions when it comes to feet, and the answers aren't necessarily provided. Not everyone knows if they have cuts or fungus on their feet, and it's a fine line to draw. To avoid any kind of discomfort, I've chosen to wear gloves if I'm even remotely unsure about a client's feet. Additionally, our instructors made it perfectly clear to us that we need to have them check the client's feet if we're unsure.

Pedicures also take a major toll on my back. It's inevitable that I'll bend my back at least a little to complete the service. Right now, I know I'm bending over much too far, and I feel it at the end of the day. It's also tiring on my arms, as I hold clients' legs up to file the feet. Legs are heavy!

One thing I do like about pedicures is the before and after. I'll spare you those pictures, but it's pretty impressive how drastic some transformations are. Some toenails reach epic lengths, so trimming them down, softening up the skin, and slapping on a neat polish job makes a huge difference! Clients really love leaving the salon with fresh feet!


We also started in on the nail enhancements part of the course, starting with nail wraps.

Wraps are any type of enhancement that uses fabric. "Fabric" is a term that includes fiberglass, linen, silk, and paper. Hardly anyone uses paper in modern salons anymore. Fiberglass is generally the preferred type of wrap. Linen wraps are the thickest. In our class, we're using the OPI fiberglass wrap system.

Wraps use a combination of adhesive and adhesive accelerator to dry. It's a rapid drying technique that requires no special light to dry. Because it's so rapid, you need to take major precautions not to let the adhesive dry on the skin. If it does, you'll have discomfort from the contact dermatitis (skin contact).

The layers of tips, resin, fabric, and accelerator build the foundation for wraps. Then filing and shaping is done to achieve a smooth finish. Wraps aren't really pretty on their own, so polish is usually added after completing the enhancement.

In addition to wraps, we learned about gel enhancements. Gel enhancements are different than gel polish. The enhancements build structure and thicken the nail dramatically. Gel polish doesn't add a foundational structure to the nail.

Gel enhancements are sometimes used in place of acrylic enhancements, however, Concha told us they don't hold up well in dry environments like Colorado. They're more popular in areas of California and Florida (think Miami and Long Beach). If your salon offers these and acrylics, you might consider these, as they don't put off such noxious fumes, they harden quickly, and they're really shiny. We use the OPI Axxium system for our gels.

This week we started learning a little about acrylics, and played with some 3D acrylic nail art! That part was a blast to me, and I'll share more about it later. 

To close up this long-ish post...I finally got my kit! The pictures and description is all under the cut.


lacc Polish Swatches and Review

Tonight's post has a wonderful rainbow of colors from a polish brand called lacc, which stands for la couleur couture. Forgive my French...but I don't know French.

Headquartered in Vancouver and manufactured in New York, la couleur couture is devoted to providing you the highest quality nail lacquers that are cruelty free, and without the use of harsh chemicals and toxic ingredients, according to their site. Vegan, breathable, gluten and paraben free, our products are made without formaldehyde, formaldehyde resin, DBP, camphor and toluene.

Just as a note, nails don't breathe. The nail plate is made of protein, which doesn't breathe. That's good new for you, because you don't need to leave polish off of your nails to let them "breathe".

That aside aside, I had a fairly good experience with these polishes. Some were streaky, which I mention below, but I really enjoy the rainbow of colors, even though their names aren't as colorful as they are.

The East meets West Coat colors inspired me to do this nail art.


Here are the swatches!


This is 1992. Oh my GOD what a perfect pretty pale pink. This creamy pale pink was a bit streaky, and required 4 coats to reach this level of opacity. It did dry very shiny when all was said and done though, even without a top coat. This creme had no shimmer.


The next pink is called 1957. Another 4-coat polish without very even coverage. The rainbow shimmer in it is a nice touch, but it's quite difficult to work with.


1950 is a lovely bright magenta creme. I needed 3 coats for this.


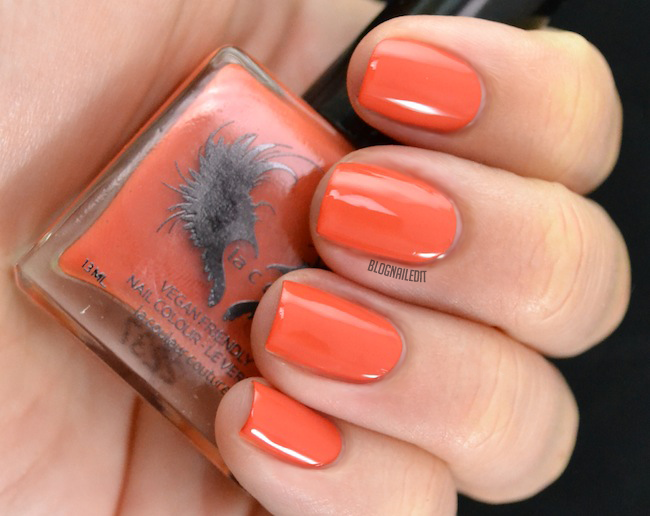
1960 is a rosy coral, slightly less purple than 1950. I needed 3 coats for 1960 too.


1963 is a sandy coral, brighter than 1960. I needed 2-3 coats, depending on my speed of application. It leveled quite well.


If you're looking to add a cherry red to your collection, try this creme, 1945. It's the perfect red, and only needs 2-3 coats.


1964 is a burnt sienna that reminds me of the Southwest palette in states like New Mexico. It made a perfect piece in my nail art for this collection. I needed 3 coats for this warm creme.


2011 is a pearly yellow, but unfortunately it's pretty streaky. The shimmer is great, but the streak was hard to deal with.


1968 is a bright sage shimmer. You need 3-4 coats for 1968. Its level of streak was about a 6.


Drink in this polish and how gorgeous it is before I destroy your dreams with the bad news. 1976 is the most streaky formula, and is terribly difficult to work with. It does have a light pink, irridescent shimmer, but after 4-5 coats almost not being enough, it's a huge pain. What a shame.


I love 1977, a murky, soft teal. It's a solid creme with no shimmer, and needs 3 coats for opacity. This is the other color used in the nail art earlier.


The final arch in the rainbow is 1972. This is a soft, dark lavender (darker than my picture shows), and is another pure creme. This was a 2-3 coat polish.

lacc polishes are available in the lacc beauty store here. for $14. That's a little steep in my opinion, but you can see how lovely some of the colors are!

These products were sent to me by lacc beauty. The reviews are based entirely on my experience with the products and were in no way influenced by anyone.

I'm nominated for InStyle's Social Media Awards!!!

I have the privelege and honor of being chosen as one of five wonderfully talented nominees for InStyle's Social Media Awards in the "Most Inspiring Manicures" category!

Click the button to vote!
Seriously, the other girls have mad skills, and I'm thrilled to be included as part of that group!

I was nominated for my tutorials Pinterest board so be sure to check that out if you haven't already!

I would love your vote and support, and love it too if you spread the word about the good news to all your friends!


Thank you InStyle for the nomination, Jenn for informing me about it, and congratulations to all of the nominees! You all deserve it!